Documentation
Get Started
Prerequisites:
Download FMSDK_v1.2.1.unitypackage From package manager in Unity
List of SDK Wrappers included in this package- Facebook SDK - Tested with version 17.0.0
- Native Reviews (iOS & Android Review Manager) - Tested with Google Play Core 1.8.1
- Analytics
- Remote Config - Using Firebase Version 11.9.0
Download Firebase Remote Config Template file for the projet you'll be using. - Ads
- IAP - Adapty SDK for IAP - Tested with 3.4.0
- Notifications
- Local Notifications - We are using a forked version of Unity Notifications which is included inside the package.
- Remote Notifications using OneSignal - Download 5.0.2 for Unity 2021 or earlier. For newer versions of unity use the latest OneSignal from Package Manager
- GDPR
- Google CMP Module using Google Mobile Ads 8.5.2
Importing it will work with Ironsource also
The advantage of this SDK is you don't need to install all the SDKs before adding this package. You can toggle the switch for the SDK you want to use and import only that one.
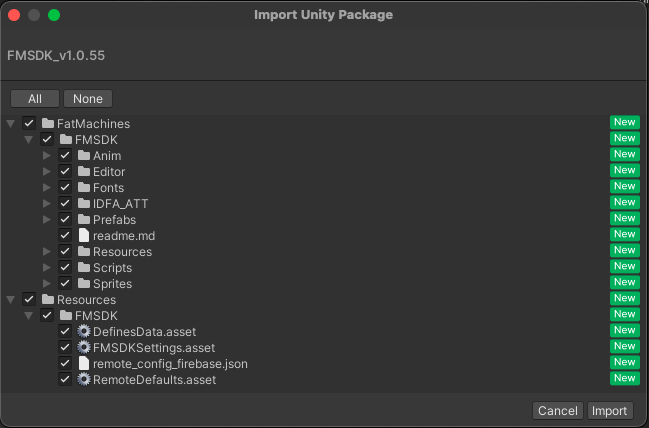
Import FMSDK 1.0.55
Import all the files included in FMSDK package
Usage
Go to Tools>FatMachines>FMSDK>Install Prefab on the first scene of your game.

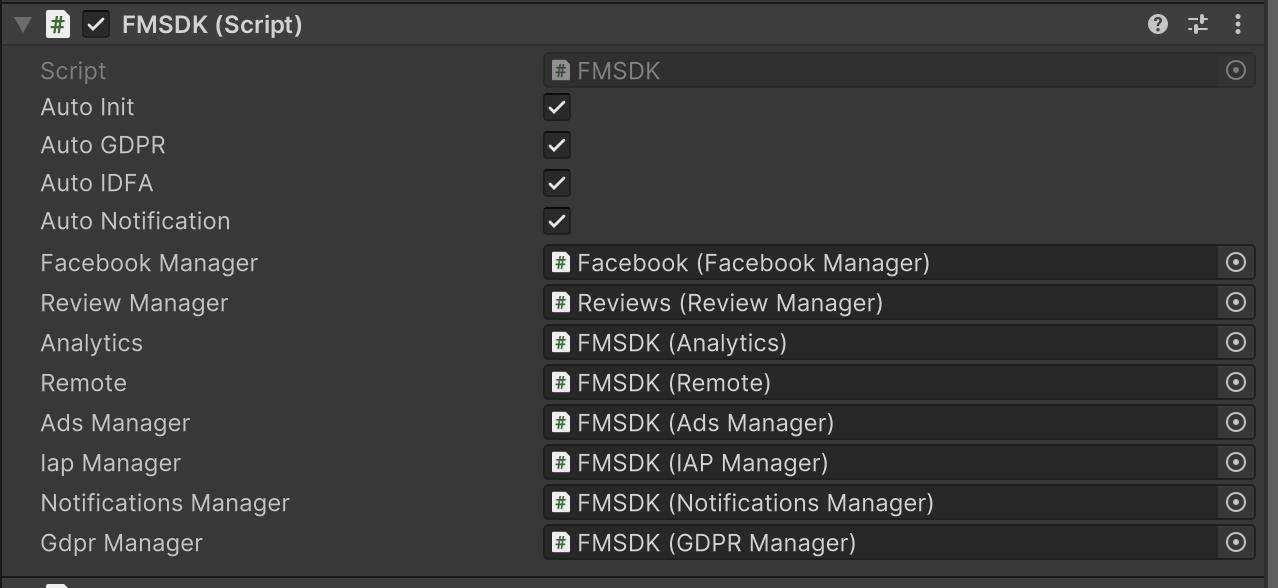
Int the FMSDK script attached to the prefab, you can see 4 checkboxes.
-
Auto Init
- If checked, this will initialize the whole SDK when this scene starts.
- Or if you want, you can initialize the SDK manually.
- Remember to initialize it only once per session.
-
//Don't use this code if Auto Init is checked
FM.FMSDK.Init();
-
Auto GDPR
- If checked, this will show a GDPR popup when the game start for the first time on the user's device. You can configure it in remote settings whether you want to show a custom GDPR popup or a Google CMP Popup.
- Or you can show the popup manually as well. You need to keep a few points in mind while calling GDPR popup manually.
- First check if the firebase remote is fetched to let the GDPRManager know if it needs to show custom popup or Google CMP popup. Don't worry if you don't use Firebase Remote. Fill out the default values and use the Remote class as it is without fetching. It'll always retutn the default data.
-
//Don't use this code if Auto GDPR is checked if (FM.Remote.IsFetched) { GDPRManager.ShowPopup(_consentDone => { }); } else { FM.Remote.AddOnDataFetch(() => { GDPRManager.ShowPopup(_consentDone => { }); }); } - This will automatically give the GDPR info to all Analytics and Ads SDK.
-
Auto IDFA
- If checked, this will automatically show IDFA popup on iOS after GDPR popup.
- Or Like other options you can also call it manually.
- Keep in mind to manage the result after the popup
-
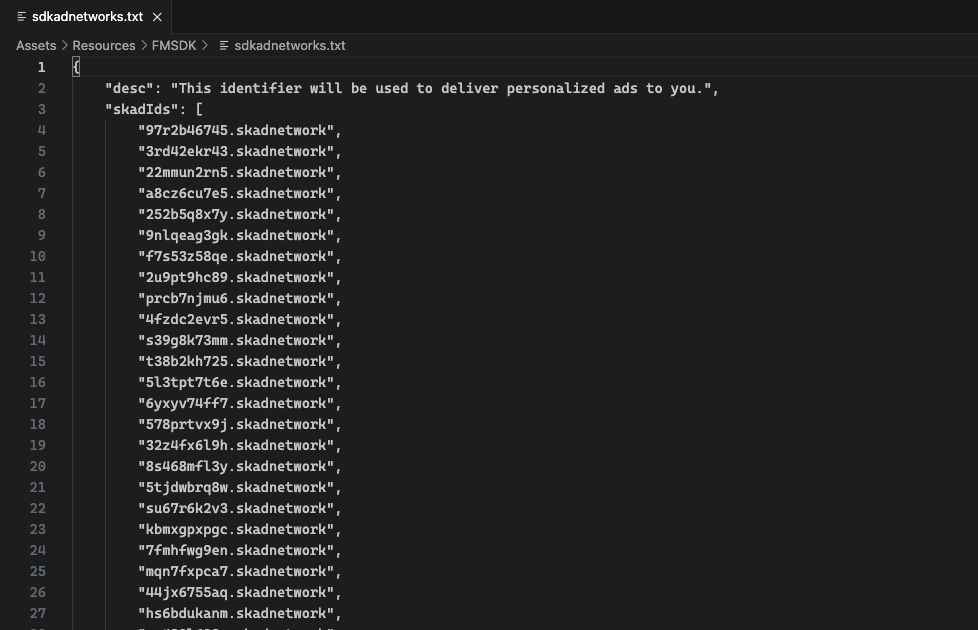
//Don't use this code if Auto IDFA is checked FM.IDFA.IDFA.RequestPopup(_idfaStatus => { }); - To add/edit the list of the skadnetworks, open Assets>Resources>FMSDK>sdkadnetworks.txt. This is a JSON file and you can put your networks' list here in the file
-
Auto Notification
- If checked, this will automatically ask for Notification Permission after GDPR popup if the platform is android and after IDFA popup if working with iOS.
- Or call it manually
-
//Don't use this code if Auto Notification is checked NotificationsManager.RequestPermission(); - You need to enable either Notification Module or Onesignal Module or both in Define Settings to be able to see the Notification permissions popup.
Defines
In FMSDK, there are a lot of modules which can be used individually. You can enable or disable any module to work
Go to Tools>FatMachines>FMSDK>Defines Settings
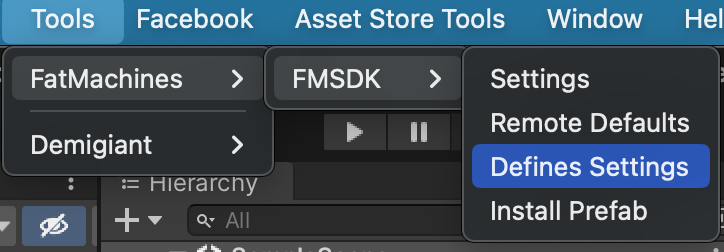
Before enabling any module, you need to add the corresponding SDK in order to make it work.
For Example: If you want to use the OneSignal SDK, you need to import the OneSignal SDK as per their documentation first.
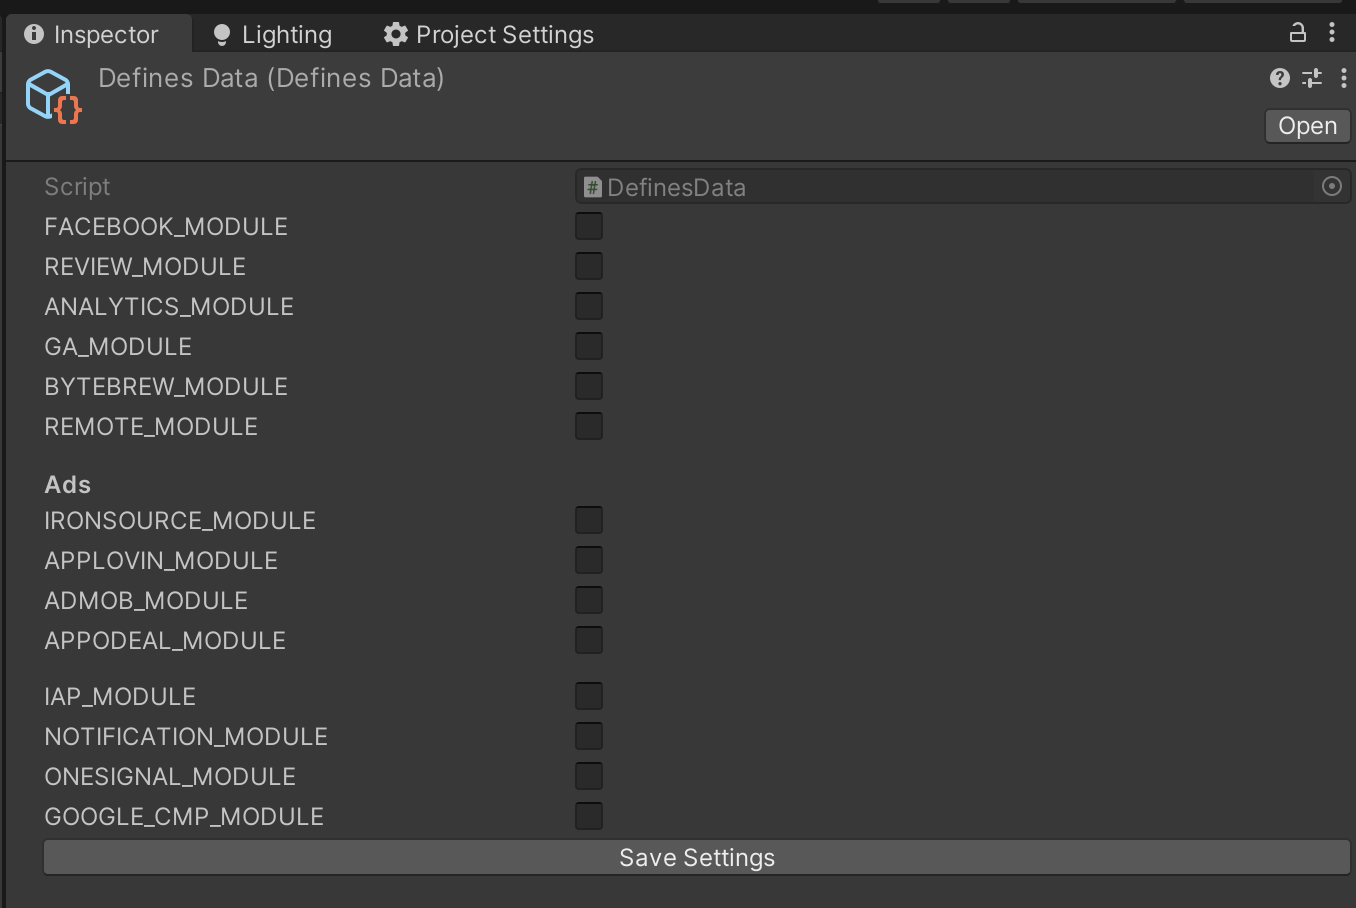
Don't forget to click on Save Settings and let the Scripts compile after enabling your required modules.
Facebook Module
Facebook Module will help you track the faceboook ads campaign as well as purchases in the game for facebook
-
First of all, Downloads the Facebook SDK from the official website or download the tested version 17.0.0 from here
-
After importing the package, Resolve Play Services Libraries for Android or Cocoapods for iOS
Go to Assets>External Dependency Manager>Android Resolver>Force Resolve for Android
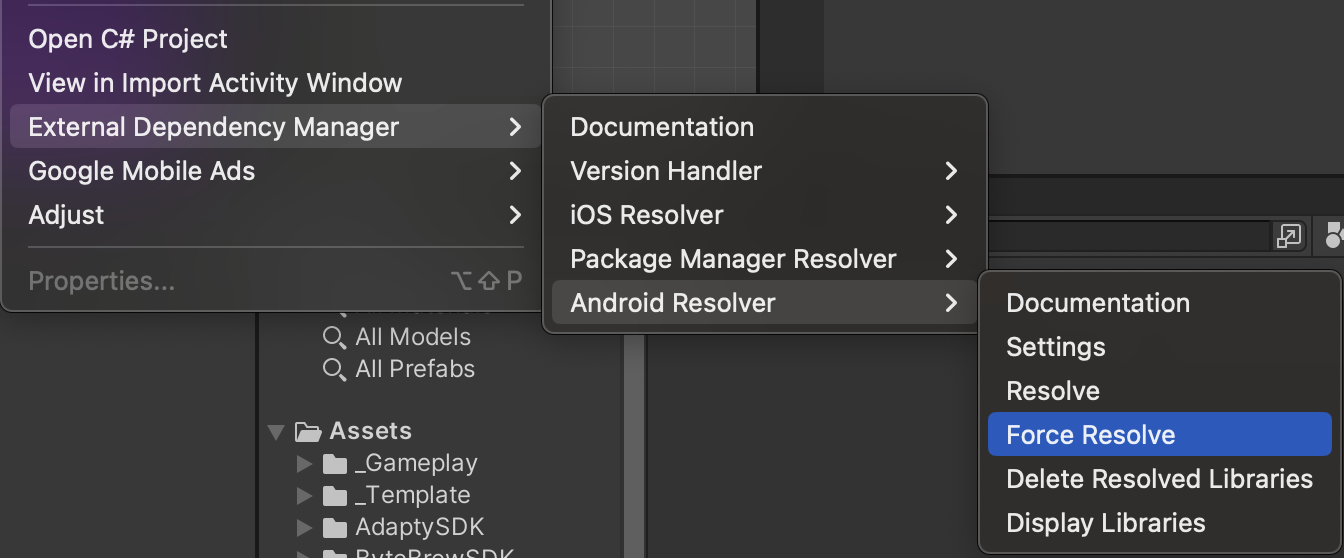
Or Go to Assets>External Dependency Manager>iOS Resolver>Install Cocoapods for iOS

-
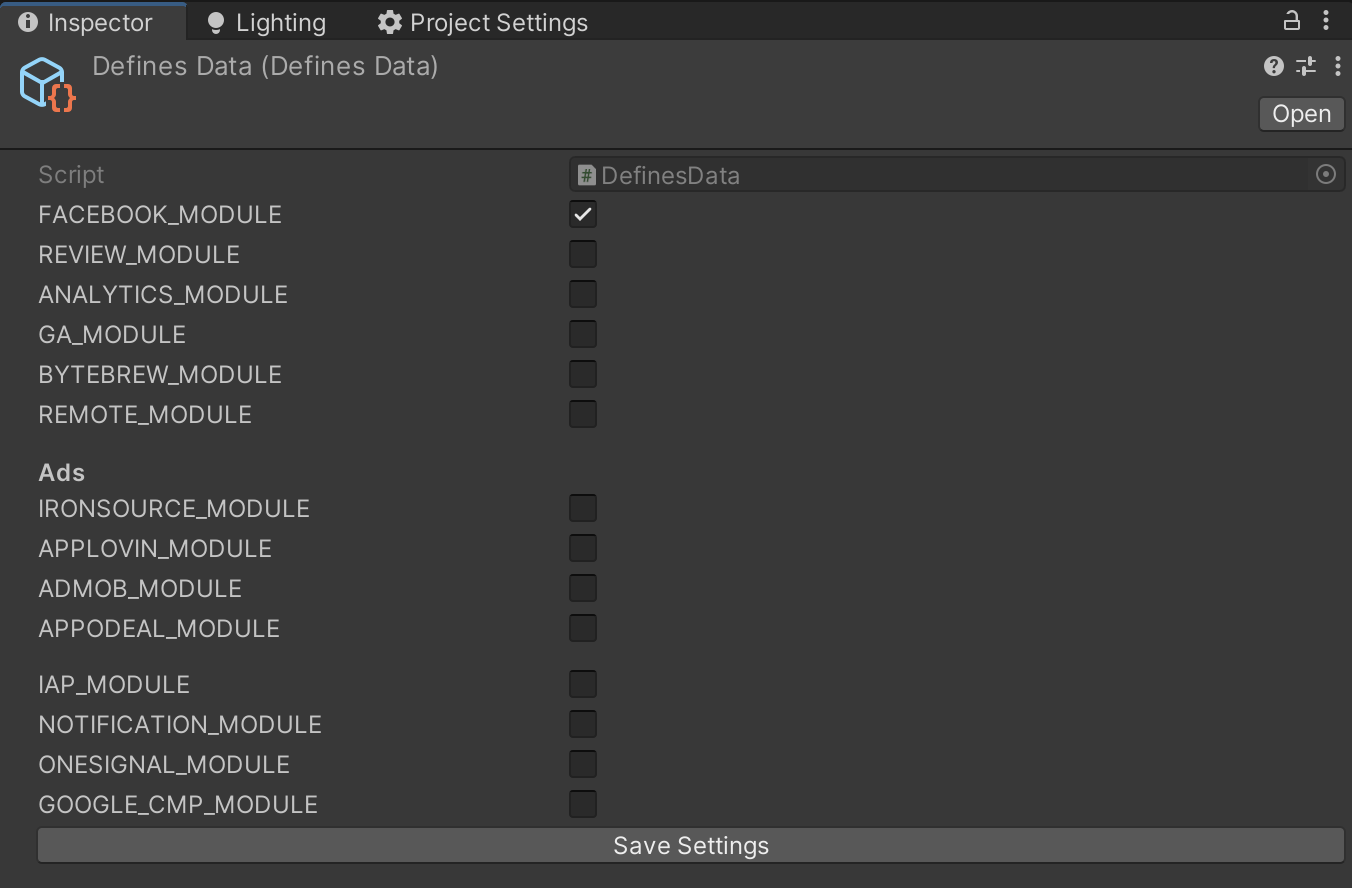
Enable FACEBOOK_MODULE in defines settings and click on Save Settings.
Go to Tools>FatMachines>FMSDK>Settings and fill the facebook settings you've retreived from Facebook's Developer Page
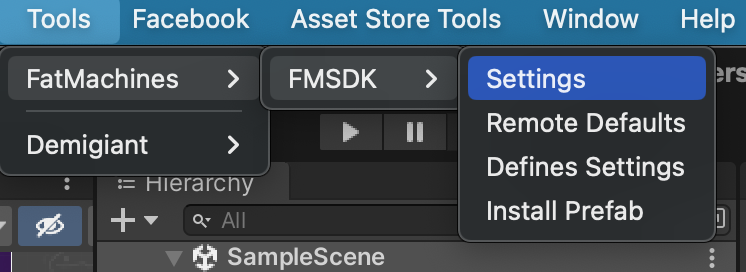
Don't forget to click on Fill the Settings Button at the bottom.
Remember to enable FACEBOOK_MODULE in the Defines Settings before this step
To get the Facebook App Id, Log in to Facebook Developer Page
-
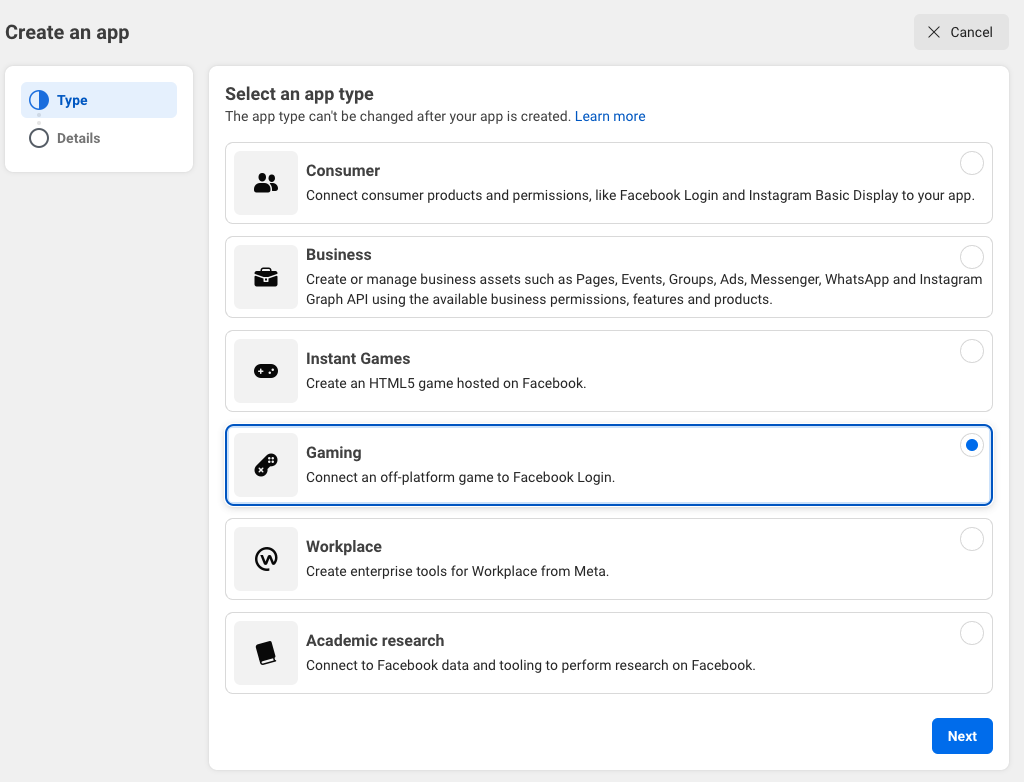
Click on Create App and Select Other.

Note that you may not see the above screen every single time you create a new app in the Facebook Developer interface. If this screen doesn't pop up, just skip this step and continue your setup as normal.
-
Select Gaming
-
Enter your details.

-
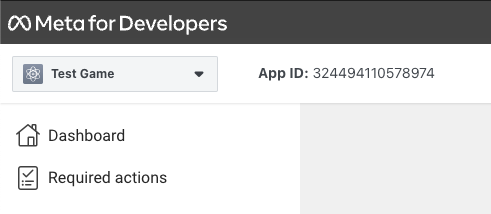
Copy the App Id from the Facebook Dashboard and go to Unity Project. Go to Tools>FatMachines>FMSDK>Settings and fill FACEBOOK_APP_ID with it.
-
Go to App Settings > Advanced and scroll to Client token. Copy the client token and go to Unity Project. Go to Tools>FatMachines>FMSDK>Settings adn fill FACEBOOK_CLIENT_TOKEN with it.
Click on Save the Settings.

-
Click on App Settings > Basic and fill in your Game's Info.

-
Scroll to bottom and click on Add Platform

-
Add platform iOS and fill in the required information
Uncheck Log in-app events automatically. It is getting recorded in the SDK

-
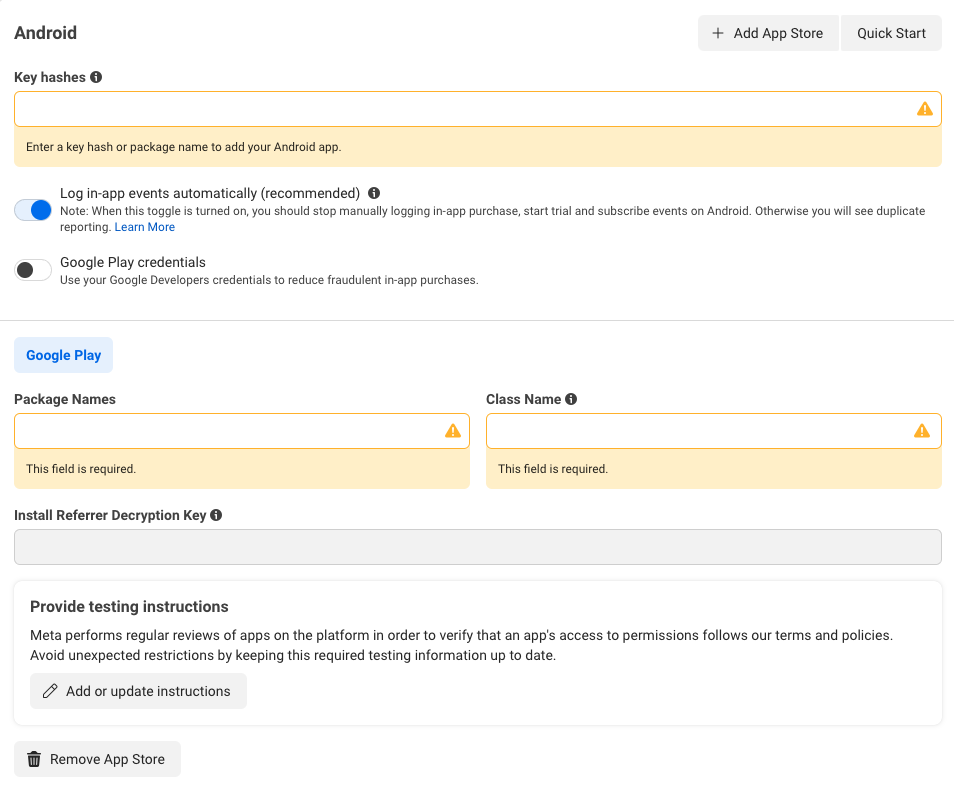
For Android, fill in the information
-
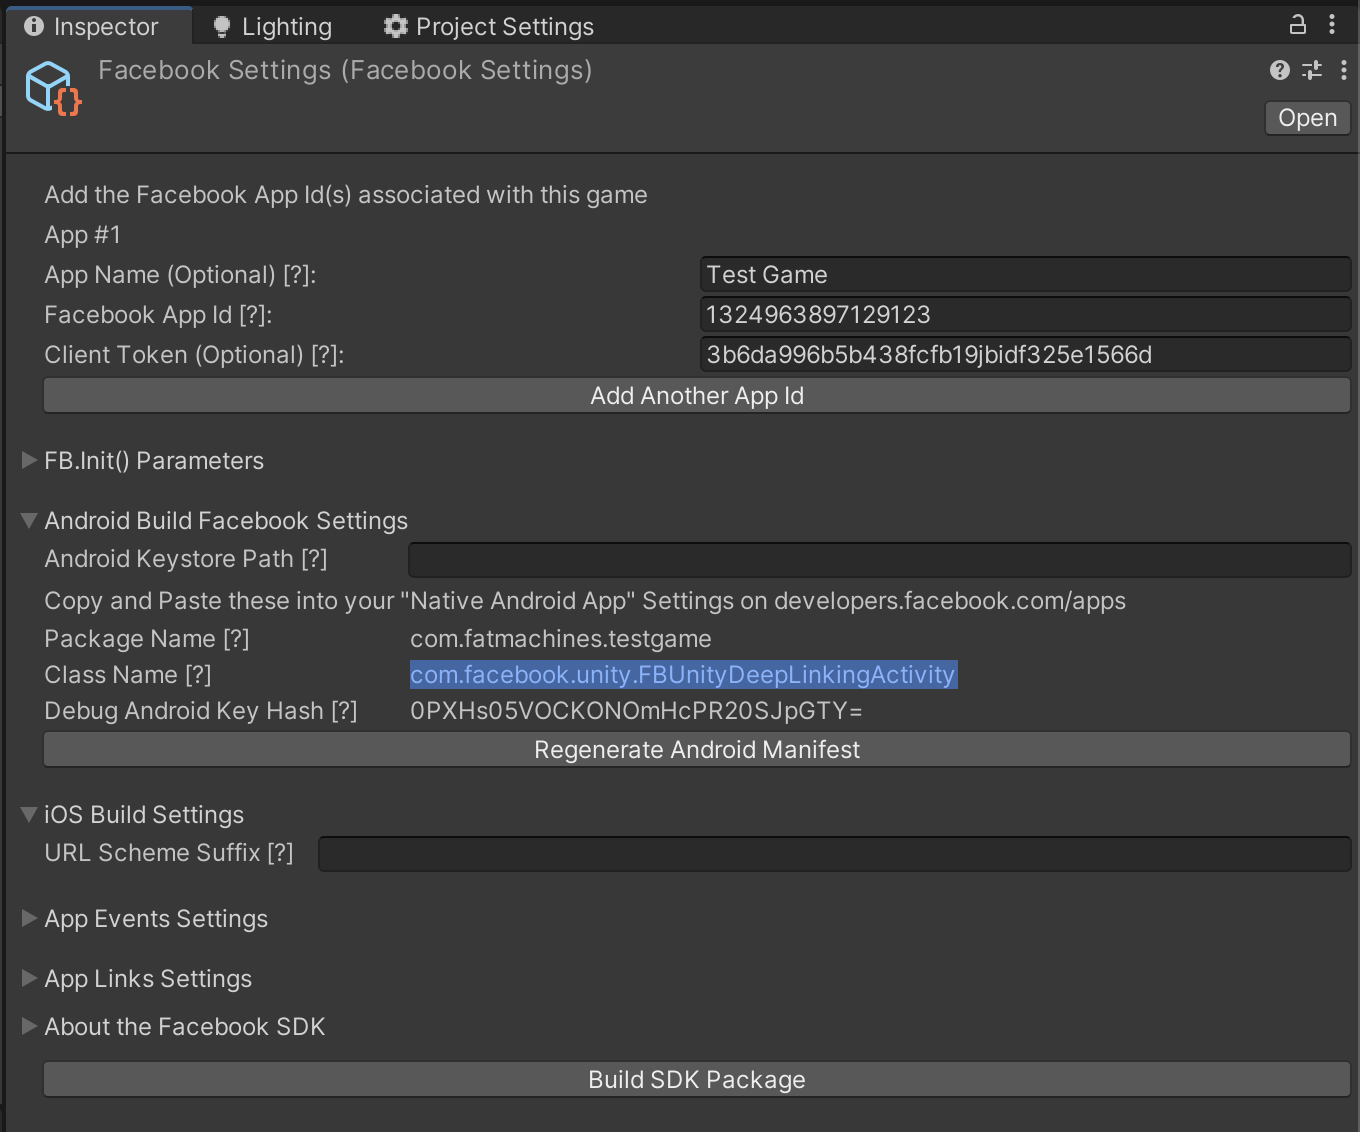
To get this information, go to your Unity Project and go to Facebook>Edit Settings

-
Copy the information and paste in facebook dashboard
-
If your game is live on the stores, Toggle the Live mode on.

Reviews Module
Reviews Module will help you show system's native Rate and Review dialog whenever you want in the game.
-
For iOS, unity already has the API and FMSDK is using that but for android, download the Google Play Review SDK. You can download it from the official website or download the tested version 1.8.1 from here
-
After importing the package, Resolve Play Services Libraries for Android or Cocoapods for iOS
Go to Assets>External Dependency Manager>Android Resolver>Force Resolve for Android

Or Go to Assets>External Dependency Manager>iOS Resolver>Install Cocoapods for iOS

-
Enable REVIEW_MODULE in defines settings and click on Save Settings

The default is set on the third session of the game. You can change that in the Remote Defaults Settings or call it manually
Go to Tools>FatMachines>FMSDK>Remote Defaults

Expand review_popup_interval and change to any number or session you want to use it in. You can keep it 0 if you don't want it to pop up automatically
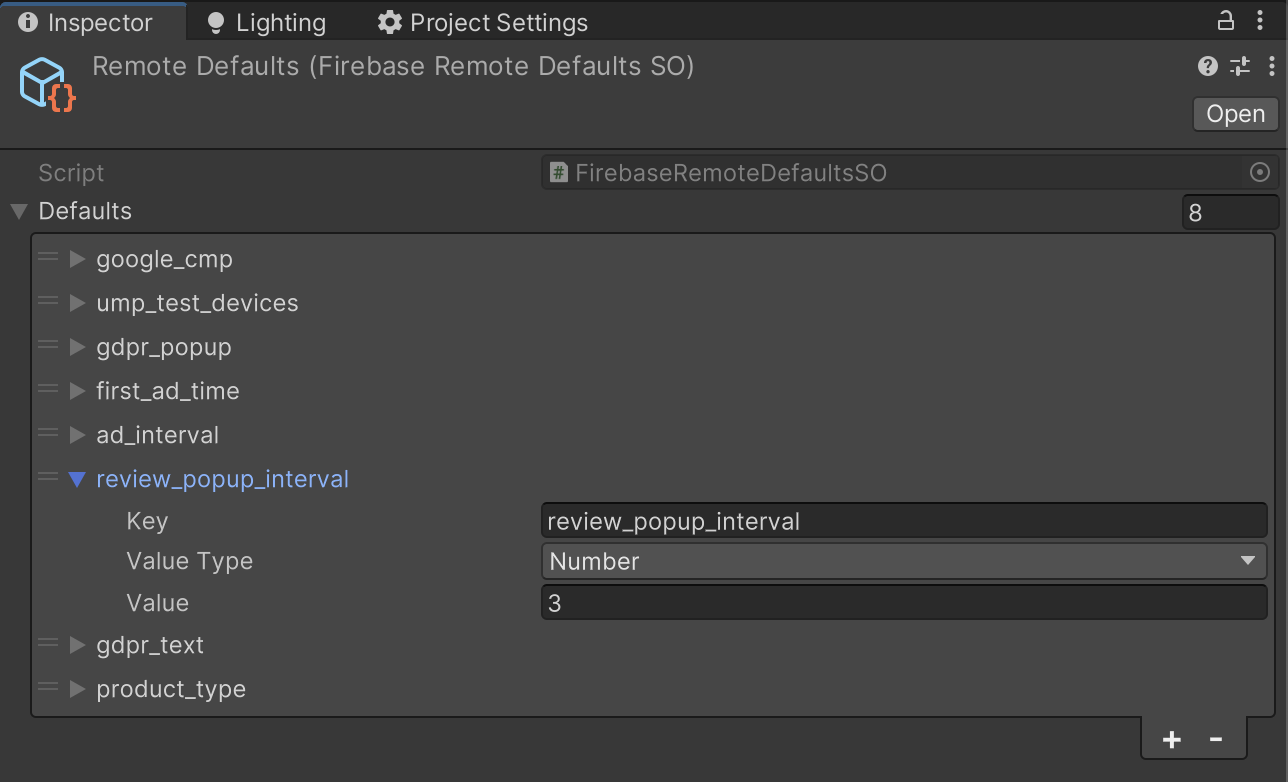
To use the manual code, call this function.
FM.FMSDK.ReviewGame();Analytics Module
Analytics Module will help you analyse and track custom events in your game using Firebase Analytics, GameAnalytics, ByteBrew Analytics or all at once.
You'll be able to track your purchases and ad revenue in all three analytics. This will help you analyse your ROAS in the ad campaigns.
-
To Add Firebase SDK and Firebase Settings, go to Firebase Section
-
To Add GameAnalytics SDK and GameAnalytics Settings, go to GameAnalytics Section
-
To Add ByteBrew SDK and ByteBrew Settings, go to ByteBrew Section
Your ad revenue and purchase revenue is getting tracked automatically. So, you don't need to worry about these events.
To track progression events, use:
FM.Analytics.LogProgressEvent(ProgressStatus.Start, "world1", "arena1", "level1");FM.Analytics.LogProgressEvent(ProgressStatus.Complete, "world1", "arena1", "level1", score: 100);Use dynamic parameters
FM.Analytics.LogProgressEvent(ProgressStatus.Start, "world1", "arena1", "level1", score: 10);FM.Analytics.LogProgressEvent(ProgressStatus.Start, "arena1", "level1", score: 10);FM.Analytics.LogProgressEvent(ProgressStatus.Start, "level1", score: 10);To track custom events, you need to use this code:
FM.Analytics.LogEvent("game_over");FM.Analytics.LogEvent("game_over");You can pass payload and payload value in the same function as well.
FM.Analytics.LogEvent("game_over", "score", "50");Multiple playloads can also be passed by using dictionary
Dictionary payloadData = new Dictionary();
payloadData.Add("score", 50);
payloadData.Add("kills", 4);
FM.Analytics.LogEvent("game_over", payloadData);
Firebase Analytics
First of all, Downloads FirebaseAnalytics SDK from Firebase Official website or download the tested version 11.9.0 from here
If you want to use Crashlytics 11.9.0 as well, download it from here.
-
Import both the packages
-
After importing the package, Resolve Play Services Libraries for Android or Cocoapods for iOS
Go to Assets>External Dependency Manager>Android Resolver>Force Resolve for Android

Or Go to Assets>External Dependency Manager>iOS Resolver>Install Cocoapods for iOS

-
Now, go to Firebase Console and create a new project
-
Enter your project's name and make sure to check Enable Google Analytics for this project and Create a new project
Now, when you go to project overview, try adding each platform one by one. Let's start with iOS. Click on iOS icon

-
Now, add all the necessary information in the form.

-
When you click on Register and move on to the next step. You'll see firebase offers a GoogleService-Info.plist file to download. You need to download the file and paste it in the Assets folder in your unity project.

-
Click and Next and skip through all the next steps and continue to console

-
Now, let's add the Android App in the dashboard as well. Click on Add app button and then click on Android icon
Again, fill out the necessary information for Android counterpart as well.

-
When you click on Register App, you'll again see a config file named google-services.json to download
Download this in the Asset folder in unity

-
Click and Next and skip through all the next steps and continue to console
You'll see both the platforms in the dashboard.

-
Crashlytics doesn't require any setup in the dasboard or doesn't require any code in the game.
-
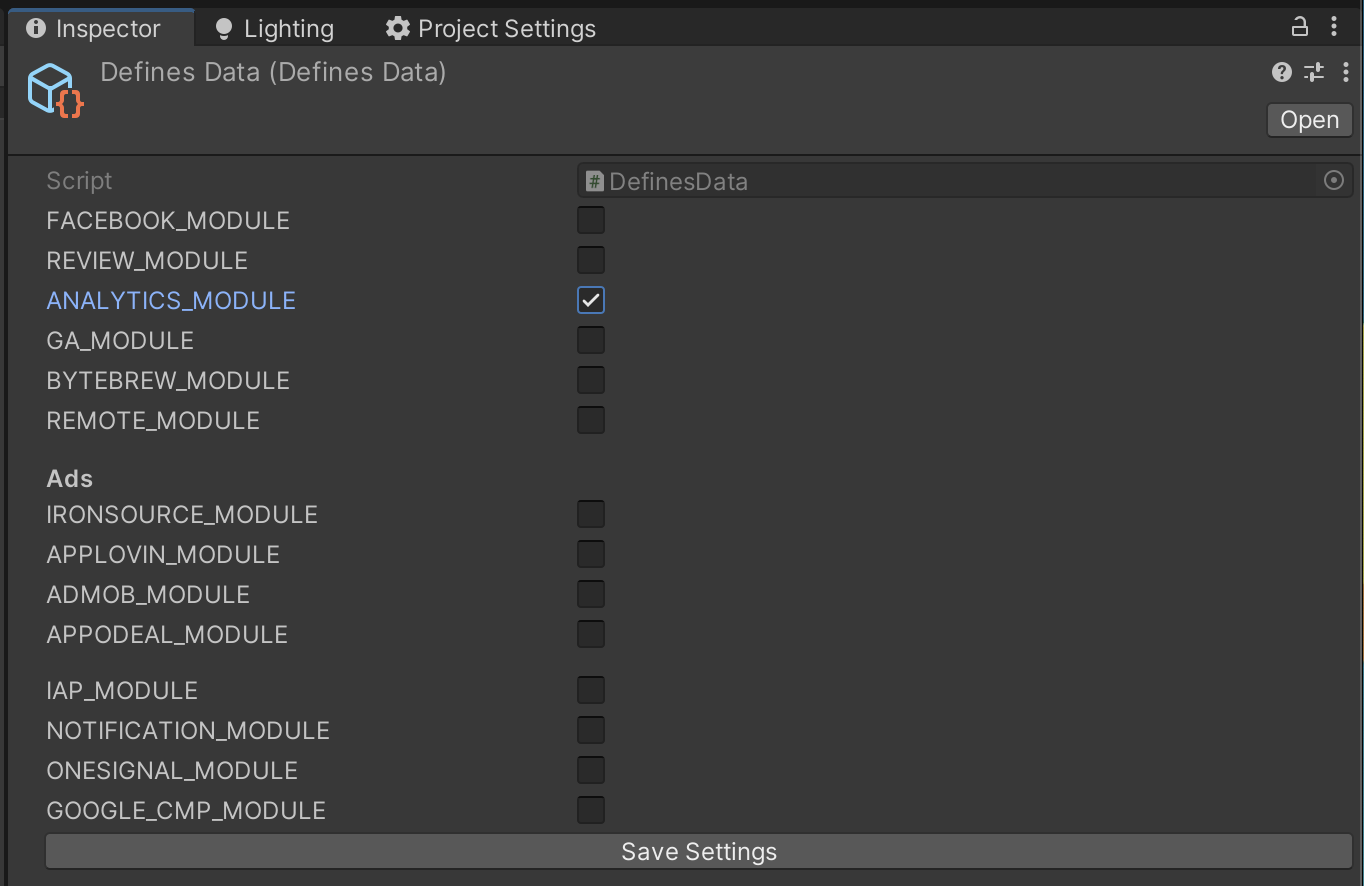
Now to enable Firebase, you need to enable ANALYTICS_MODULE in Defines Settings and click on Save Settings.

GameAnalytics
First of all, Downloads GameAnalytics SDK from the official website or download the tested version 7.10.4 from here
-
Import the packages
-
After importing the package, Resolve Play Services Libraries for Android or Cocoapods for iOS
Go to Assets>External Dependency Manager>Android Resolver>Force Resolve for Android

Or Go to Assets>External Dependency Manager>iOS Resolver>Install Cocoapods for iOS

-
Now, let's create a project for iOS in GameAnalytics. For android, you'll have to repeat these steps.

-
Fill in all the required information with bundle id and click on Create Game

-
Continue to dashboard and you'll see the Game Key and Secret Key

-
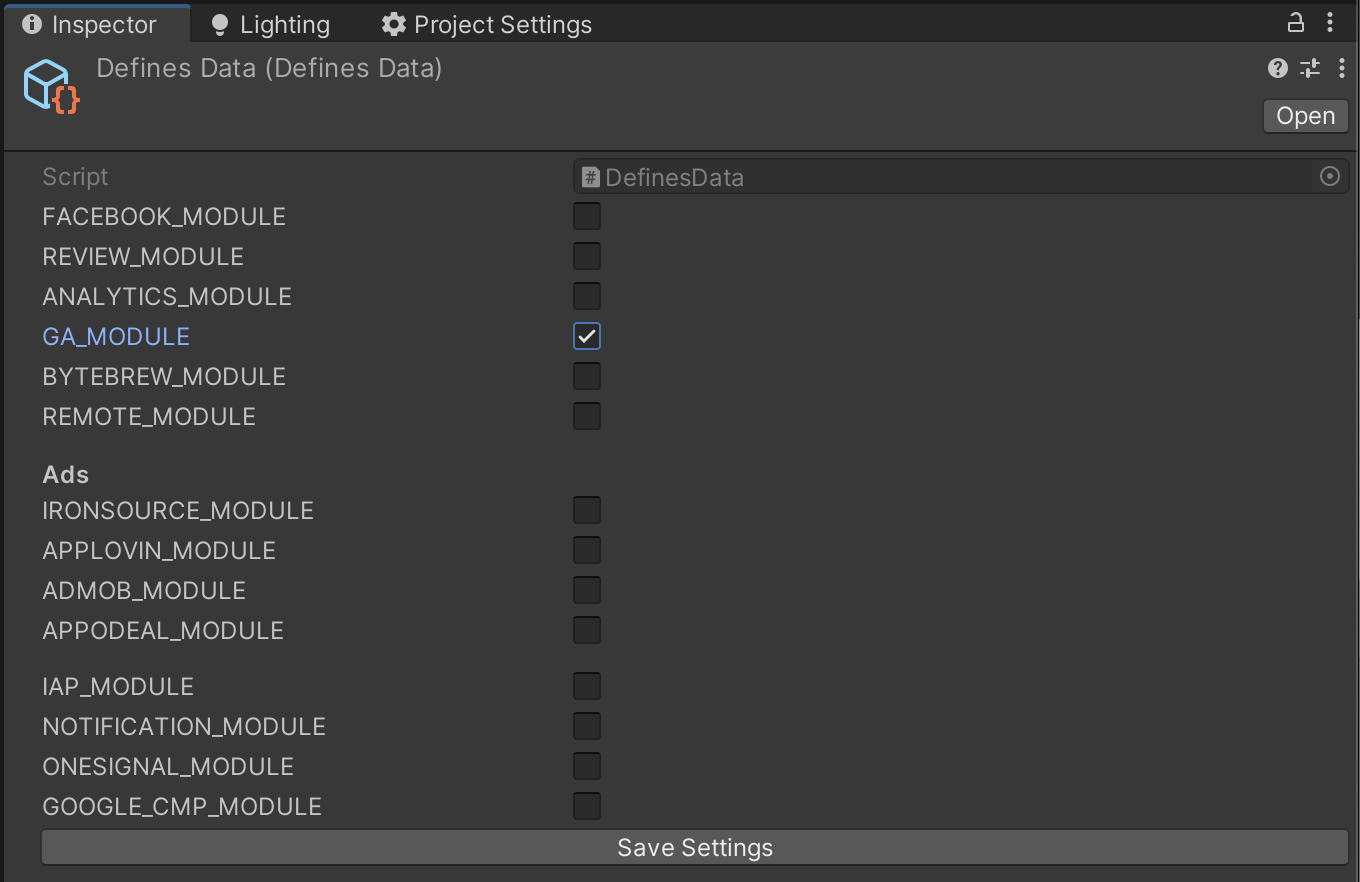
Now, enable GA_MODULE in Defines Settings and click on Save Settings
-
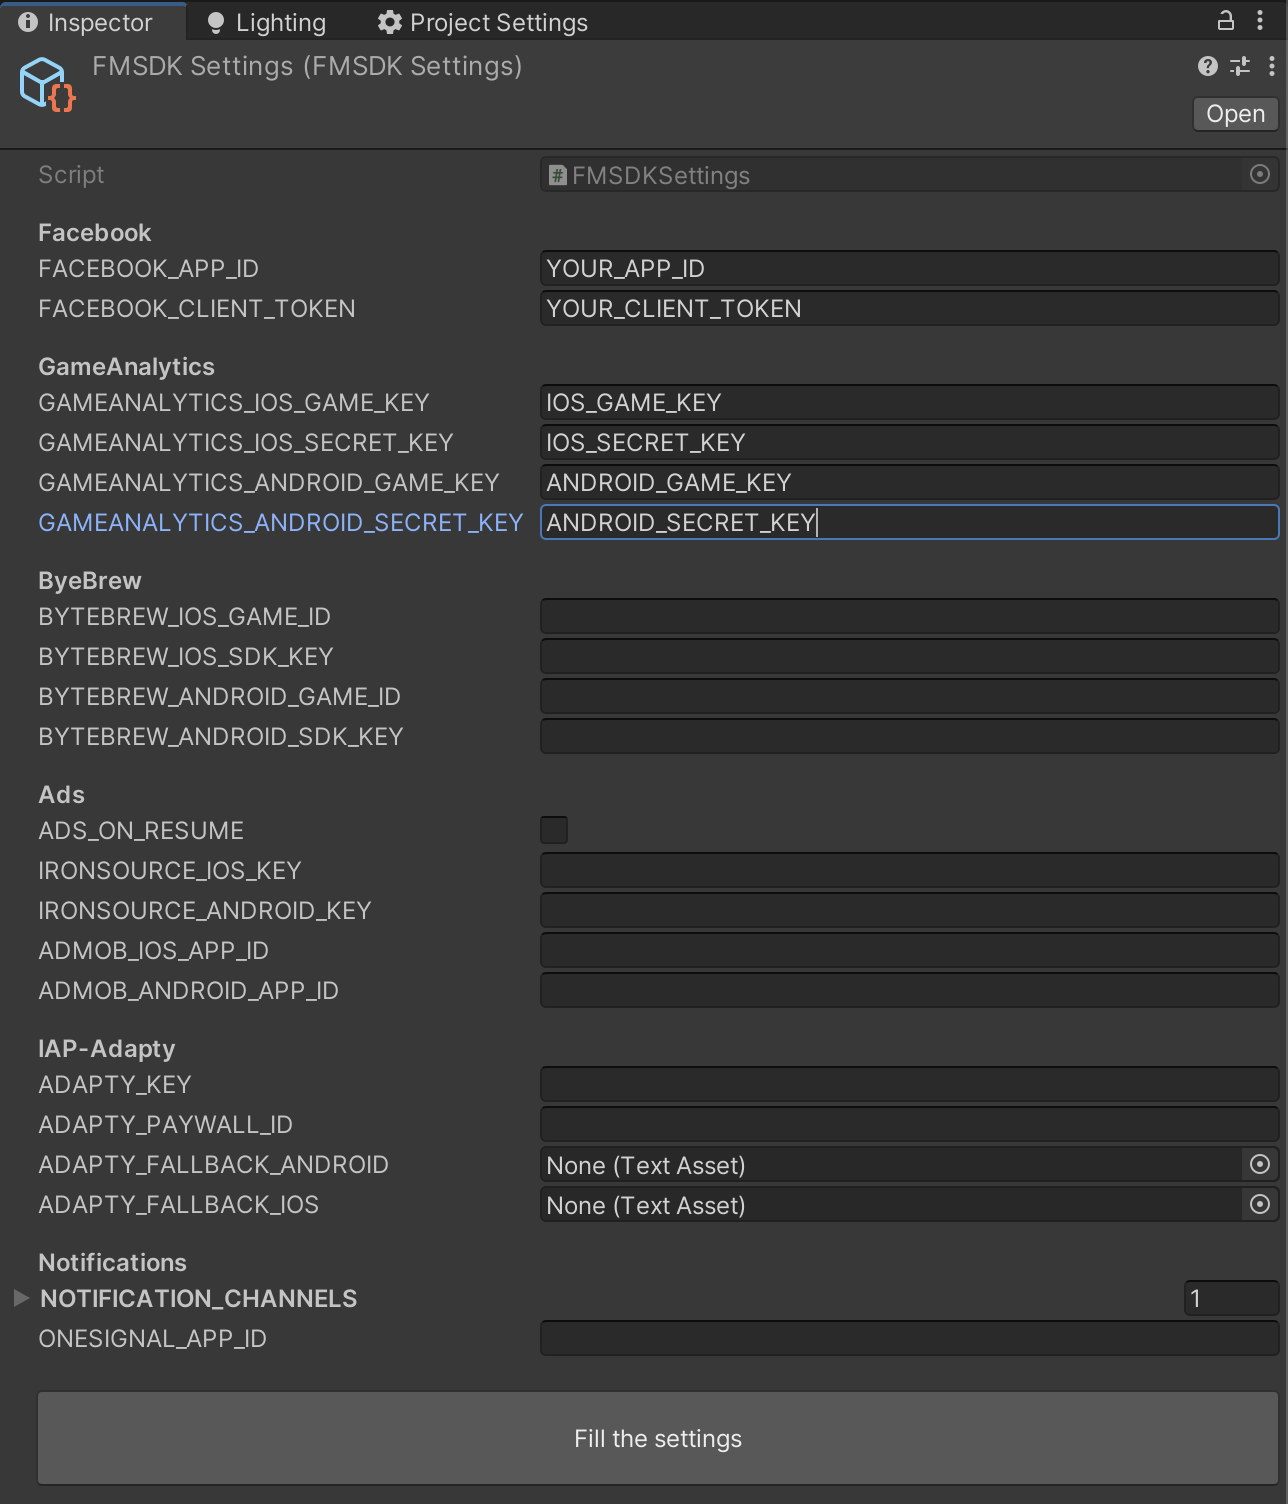
Go to the FMSDK Settings page via Tools>FatMachines>FMSDK>Settings

-
Paste in your Game Key and Secret Key for both the platform and click on Fill the Settings button. It'll fill all the settings in the GA package.
Don't forget to enable GA_MODULE in Defines Settings before this step.
ByteBrew Analytics
First of all, Downloads GameAnalytics SDK from the official website or download the tested version 0.1.3 from here
-
Import the packages
-
After importing the package, Resolve Play Services Libraries for Android or Cocoapods for iOS
Go to Assets>External Dependency Manager>Android Resolver>Force Resolve for Android

Or Go to Assets>External Dependency Manager>iOS Resolver>Install Cocoapods for iOS

-
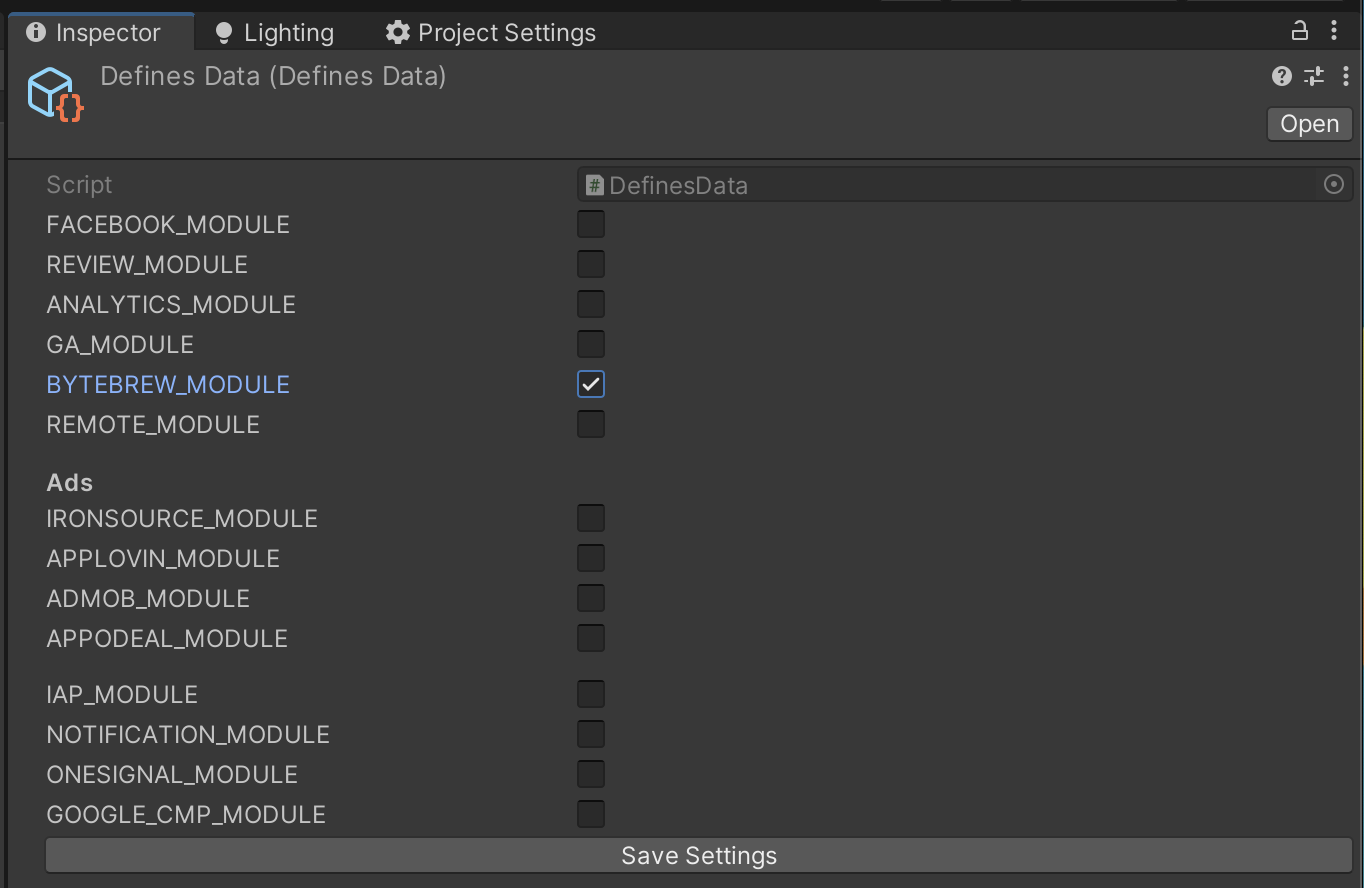
Now, enable BYTEBREW_MODULE in Defines Settings and click on Save Settings
-
Go to ByteBrew Dashboard and create a new game.
Fill in the information for both the platforms

-
Now, in the game's page, go to Settings and scroll to bottom. You'll find the Game ID and SDK Key
Copy both of them

-
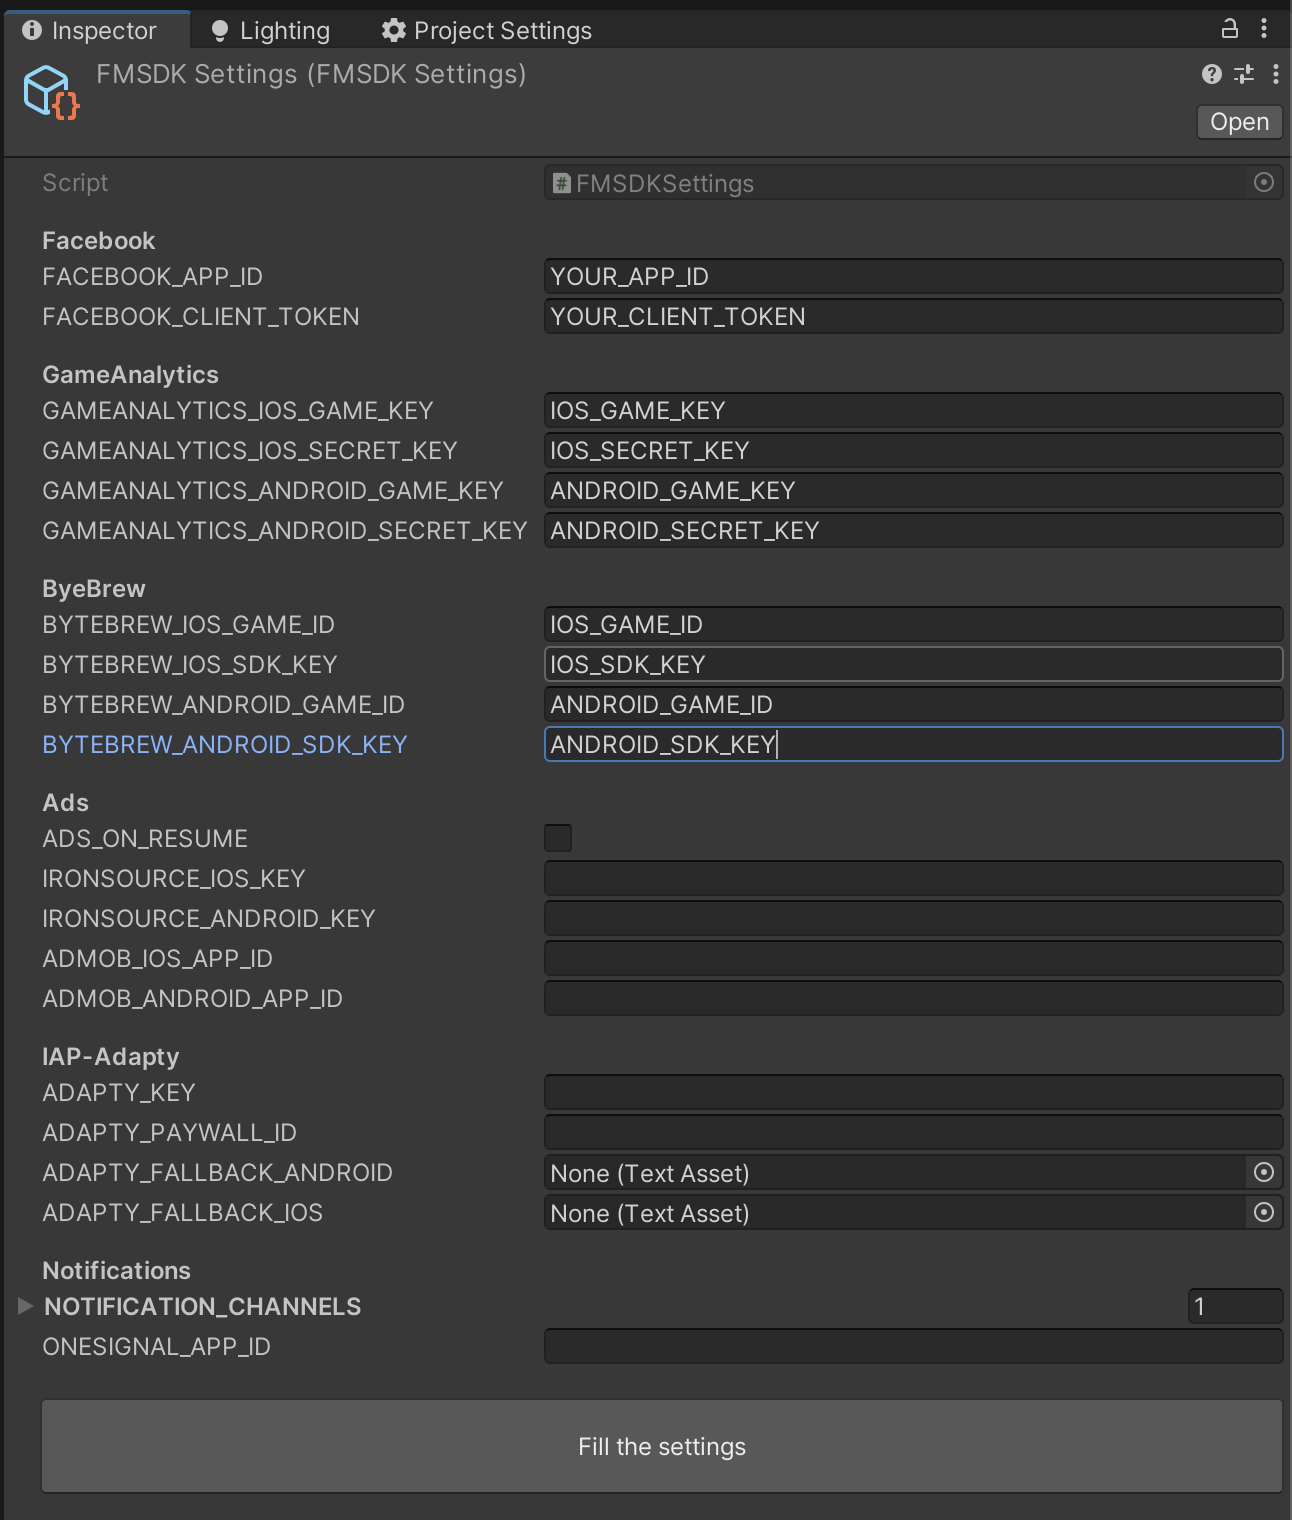
Go to the FMSDK Settings page via Tools>FatMachines>FMSDK>Settings

-
Fill in your Game Keys for both the platform and click on Fill the Settings button. It'll fill all the settings in the ByteBrew settings
Don't forget to enable BYTEBEW_MODULE in Defines Settings before this step
Remote Config Module
Remote Config Module will help you fetch Remote Data from the Firebase Remote Config
You'll be able use the default offline values as it is without enabling the REMOTE_MODULE
First of all, Downloads FirebaseRemoteConfig SDK from Firebase Official website or download the tested version 11.9.0 from here
Let's setup remote config on Firebase Dashboard as well as in unity
-
Download the Remote Config Template file to put in Firebase from here
-
Now, go to your already created Firebase Project and find Remote Config option in the engage section

-
In the dashboard, you can see two options. One is Create Configuration and other is Upload Template
Now, if you want to use all custom remote config, then you can go ahead and start creating your own configuration.
But, if you are using the whole suite of FMSDK, then there are some default remote configs the SDK is using. You can upload that by clicking on Upload Template
Upload the remote_config_firebase.json file you've already downloaded in the upload slot and click on Publish

-
Now, your Remote Configs will look like this.

-
The Dashboard setup is complete, now move on to Unity Setup
-
Import the downloaded Remote Config Package in Unity
-
After importing the package, Resolve Play Services Libraries for Android or Cocoapods for iOS
Go to Assets>External Dependency Manager>Android Resolver>Force Resolve for Android

Or Go to Assets>External Dependency Manager>iOS Resolver>Install Cocoapods for iOS

-
Download google-services.json and GoogleService-Info.plist files from firebase and paste it in Assets folder. For this step, go to Firebase Analytics Setup Section or Skip this step if done already for Firebase Analytics
-
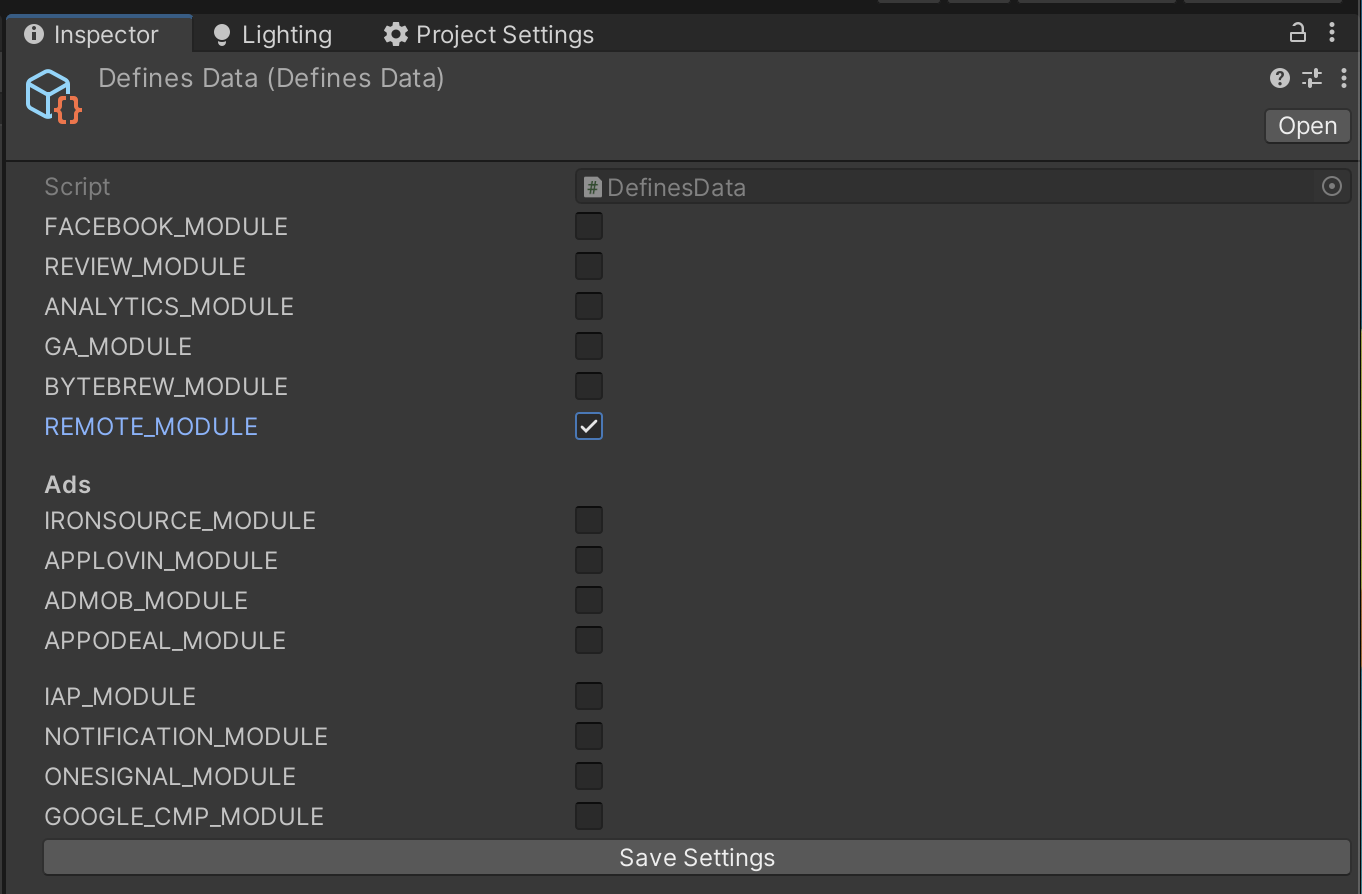
Now, enable REMOTE_MODULE in Defines Settings and click on Save Settings
Now, the setup process has been completed, we can go to the code part where we can fetch the data.
Fetch Data from anywhere in the code. You need to declare a default value in order to fetch the data.
-
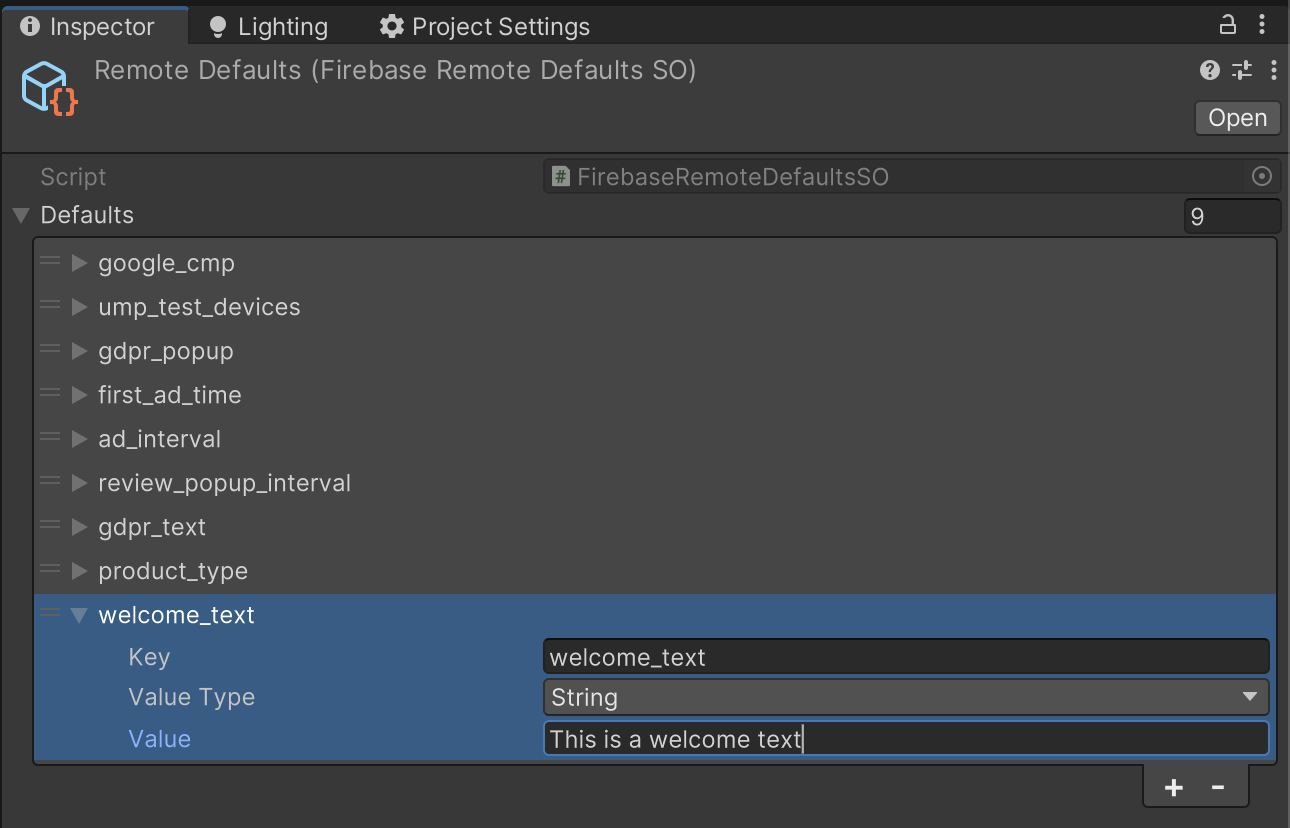
Go to Tools>FatMachines>FMSDK>Remote Defaults

-
Add a new default value which you've added in the Firebase
-
To fetch the remote value, first we'll check if the remote values has been fetched or not?
bool remoteFetched = FM.Remote.IsFetched; -
If the values has not been fetched, we'll add a listener to remote.
FM.Remote.AddOnDataFetch(() => { }); -
Now, we can use the fetched data in our values. If we try to fetch the values before fetching the remote, it'll return the default values saved in the the previous step.
if (FM.Remote.IsFetched) { string welcomeText = FM.Remote.GetString("welcome_text"); } else { FM.Remote.AddOnDataFetch(() => { string welcomeText = FM.Remote.GetString("welcome_text"); }); } -
You can fetch number or boolean using these functions
int value = FM.Remote.GetNumber("number_key");
bool value = FM.Remote.GetBoolean("number_key");
Ads Module
Ads Module will help you call your Ads/Mediation Network SDKs function from one class only.
Why using this is an advantage over creating custom code?
Suppose you are using Admob Mediation today and want to change to Ironsource suddenly. Now, you'll have to change your whole codebase according to Ironsource's structure. But using single class AdsManager which was called in every code won't change. You'll need to toggle the SDK which you want to use.
Using the Ads Code
To Show the Banner Ad, you need to check if the ads sdk has been initialised or you'll have to wait.
if (FM.AdsManager.IsInitialised) {
    ShowBanner();
} else {
    FM.AdsManager.AddOnInitialised(ShowBanner);
}
In the Banner.Show function, let's check if we need to load a banner
The Banner.Show function will automatically record your Ads revenue in Firebase and ByteBrew analytics
void ShowBanner() {
    if (FM.AdsManager.Banner.IsLoaded) {
        FM.AdsManager.Banner.Show();
    } else {
        FM.AdsManager.Banner.Load(ShowBanner);
    }
}

void ShowBanner(bool bannerLoaded) {
    ShowBanner();
}
To show the Interstitial ads, first check if the interstitial is available
The Interstitial.Show function will automatically record your Ads revenue in Firebase and ByteBrew analytics
public void ShowInterstitial() {
    if (FM.AdsManager.Interstitial.IsLoaded) {
        FM.AdsManager.Interstitial.Show("game_over", () => {
            Debug.Log("Interstitial Closed");
        });
    } else {
        FM.AdsManager.Interstitial.SetOnLoad(_adLoaded => {
            Debug.Log("Interstitial Loaded");
        });
    }
}
To show the Rewarded ads, first check if the rv is available
The RewardedVideo.Show function will automatically record your Ads revenue in Firebase and ByteBrew analytics
public void ShowRV() {
    if (FM.AdsManager.RewardedVideo.IsLoaded) {
        FM.AdsManager.RewardedVideo.Show("add_coins", _rewarded => {
            Debug.Log("Ad Closed, Rewarded: " + _rewarded);
        });
    } else {
        FM.AdsManager.RewardedVideo.AddOnLoad(() => {
            Debug.Log("RV Loaded. Update UI");
        });
    }
}
Before showing the first interstitial, the SDK checks for the time mentioned in the remote settings.
Also, to prevent the excessive display of interstitial ads in a small span of time. There are two parameters added in the remote config.
You can check if ShowInt will show the ad or not by using this code
bool canShowInterstitial = FM.AdsManager.Interstitial.CanShow;| Parameter | Default Value | Description |
|---|---|---|
| first_ad_time | 15 | First interstitial ad in the game will be shown after 15 seconds when the game has been started. You can change it to any number in Remote Defaults as well as on the Firebase Remote |
| ad_interval | 30 | Every interstitial ad will be shown after a minimum gap of 30 seconds in the game. You can change it to any number in Remote Defaults as well as on the Firebase Remote |
| ad_on_resume | false | Here you can specify if you want to show an app open ad when user come back to the game after the game went to background. And intersittial ad will be shown in case of ironsource as they don't support App Open Ads like Admob does |
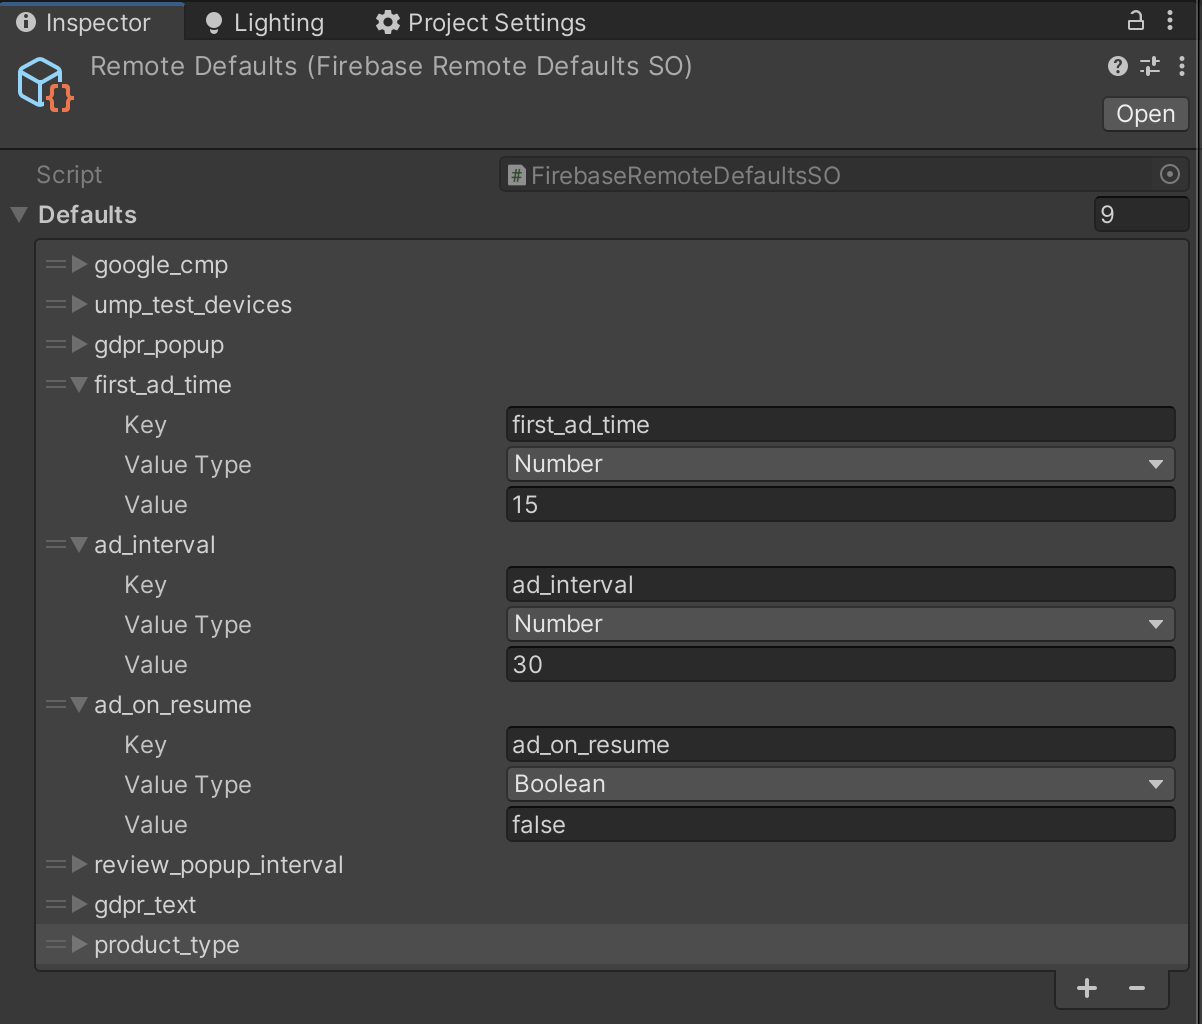
ad_on_resume will show an interstitial ad (in Ironsource) or App Open Ad (in Admob) whenever your game will come to foreground from background.
Sometimes, your games need to go to background intentionally like to get a review or while making an IAP. You don't want to show an ad there when user returns to the game. You can use SDK_BACKGROUND to prevent showing unnecessary ads.
bool gameBackgroundViaSDK = FM.FMSDK.SDK_BACKGROUND;Ironsource
First of all, Downloads Ironsource SDK from Levelplay Official website or download the tested version 8.8.1 from here
-
Import the package in Unity
-
After importing the package, Resolve Play Services Libraries for Android or Cocoapods for iOS
Go to Assets>External Dependency Manager>Android Resolver>Force Resolve for Android

Or Go to Assets>External Dependency Manager>iOS Resolver>Install Cocoapods for iOS

-
Now, enable IRONSOURCE_MODULE in Defines Settings and click on Save Settings
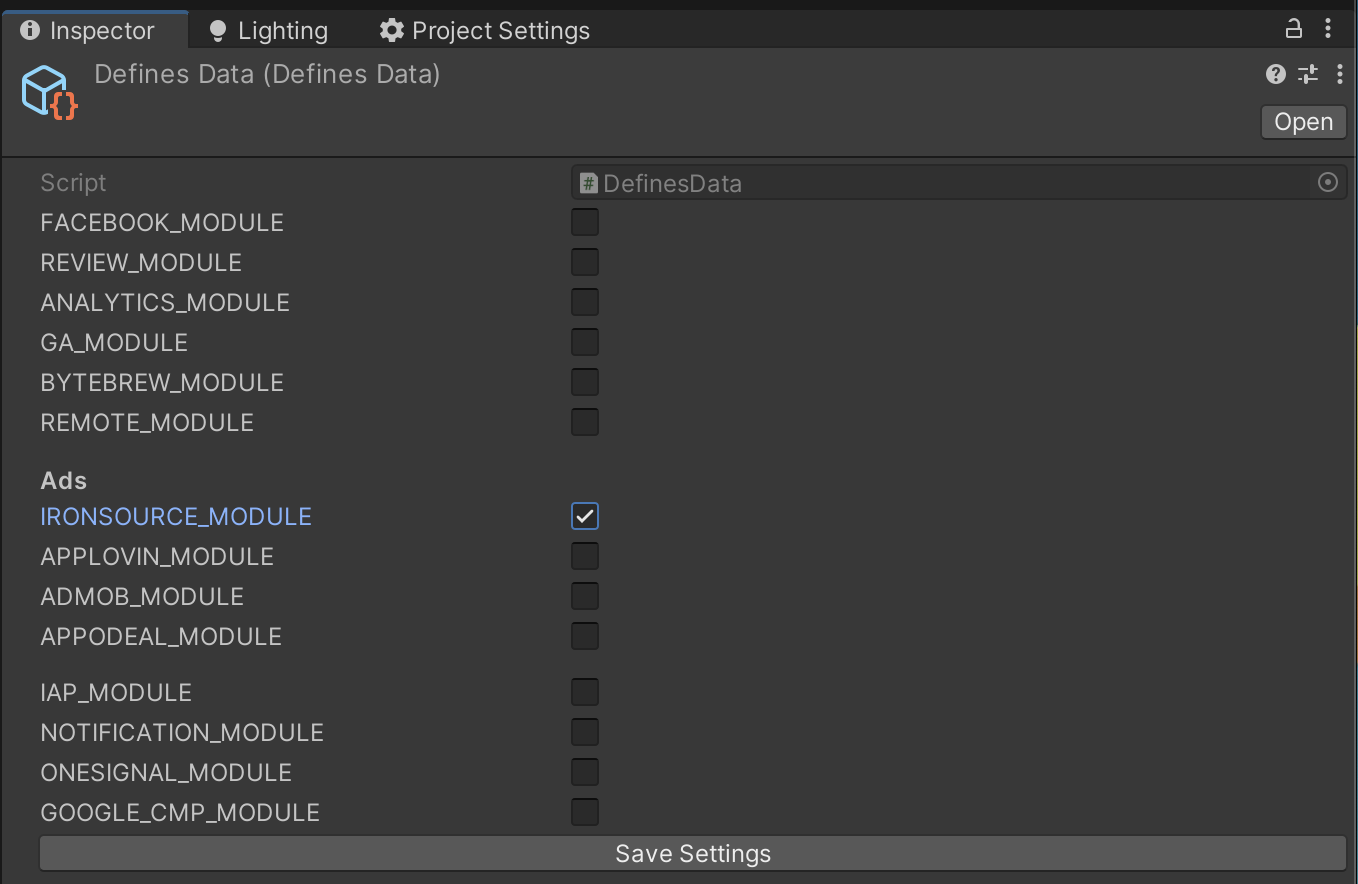
-
Go to Ironsource dashboard and create a new App there.
Fill in the required information and get the App Id

-
You'll get your App Id and

-
By going into SDK networks section, you can setup your mediation with other ad networks.
You can get repeat this process to get App Id for both the platforms.
-
If you are using Admob in your mediation, you'll require Admob App Id as well. Let's create one here
Go to Admob Dashboard
Click on Apps>Add App

-
Fill in the required information

-
Once you create your Admob App, you can find the App Id from App Settings Page

-
Go to Tools>FatMachines>FMSDK>Settings to fill the Ironsource Settings.

-
Fill the Ironsource Settings in the inspector window and click on Fill the Settings button
Don't forget to enable IRONSOURCE_MODULE in Defines Settings before this step.
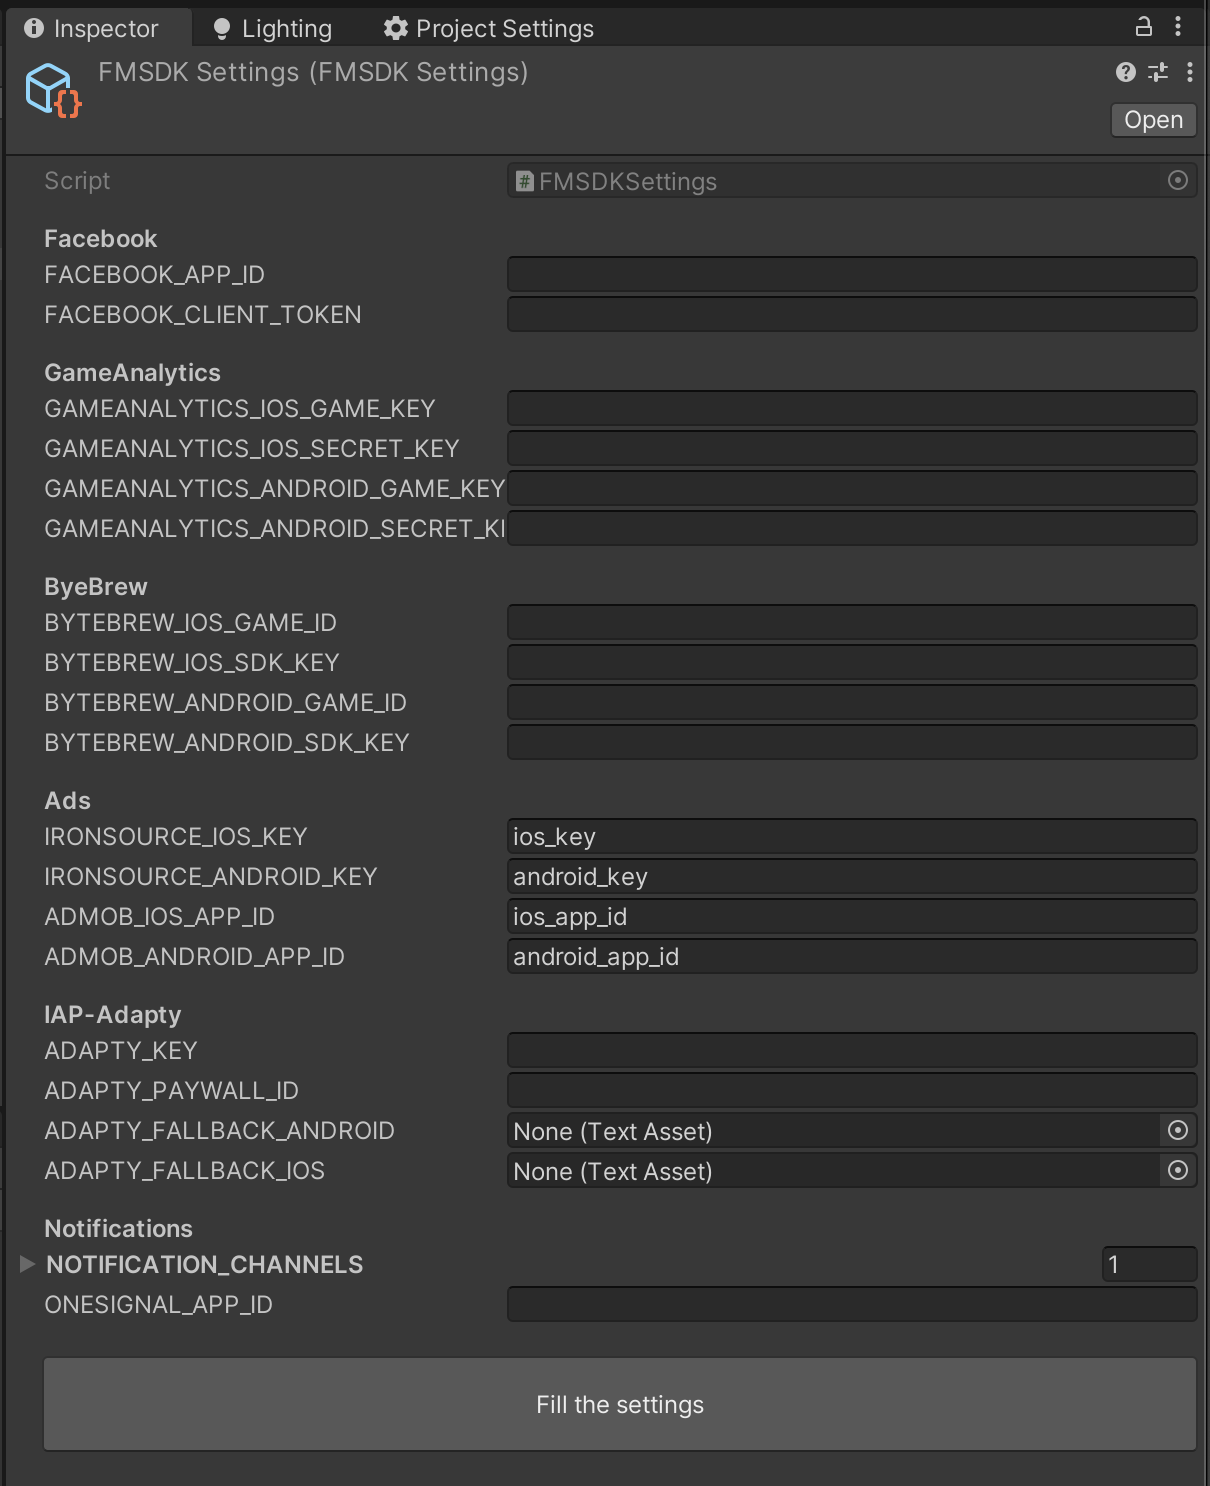
Admob
First of all, Downloads Admob SDK from Google's Official website or download the tested version 8.5.2 from here
-
Import the package in Unity
-
After importing the package, Resolve Play Services Libraries for Android or Cocoapods for iOS
Go to Assets>External Dependency Manager>Android Resolver>Force Resolve for Android

Or Go to Assets>External Dependency Manager>iOS Resolver>Install Cocoapods for iOS

-
Now, enable ADMOB_MODULE in Defines Settings and click on Save Settings
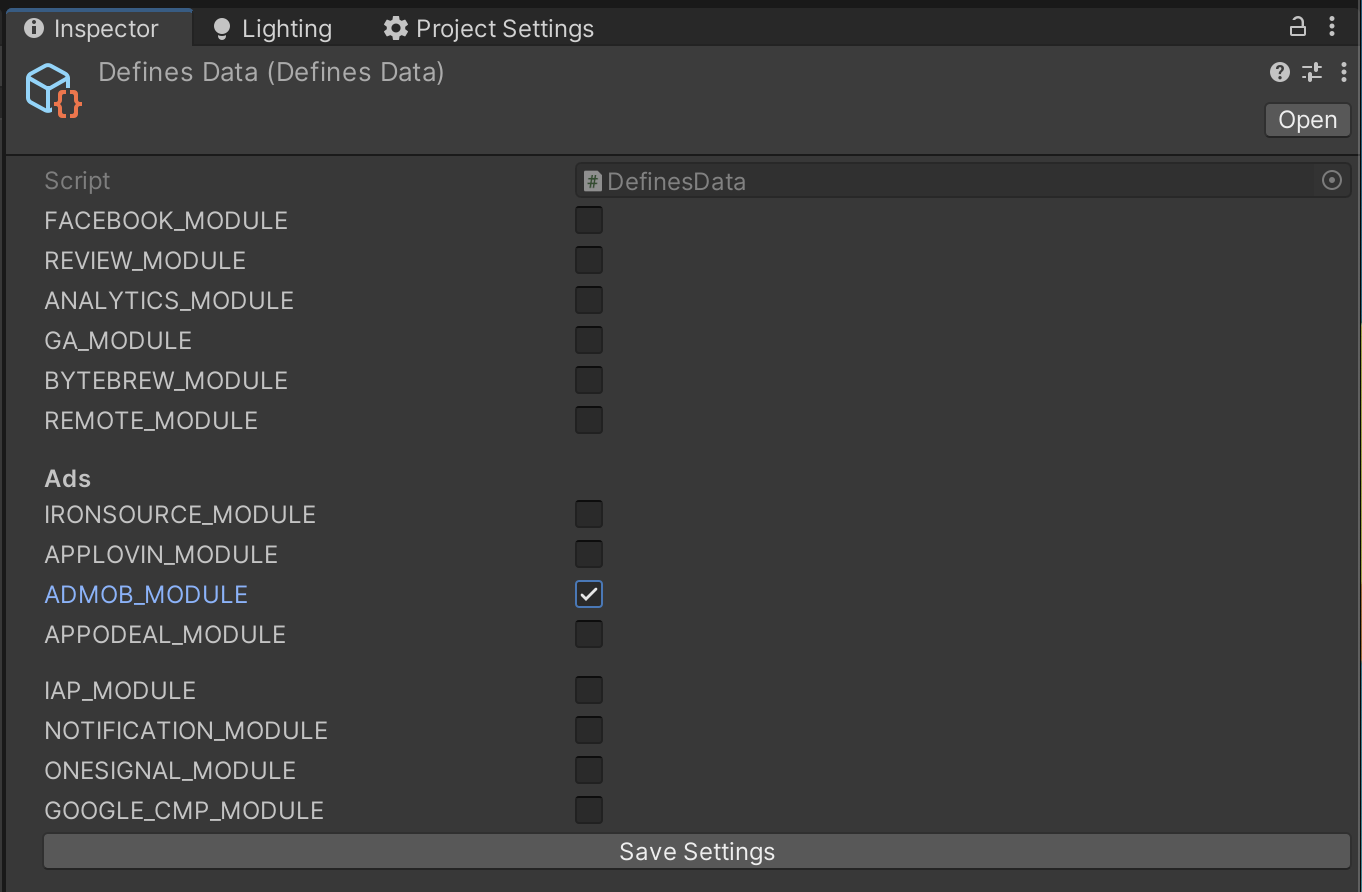
-
You need to get the iOS and Android app ids from the admob dashboard. Let's create one here
Go to Admob Dashboard
Click on Apps>Add App

-
Fill in the required information

-
Once you create your Admob App, you can find the App Id from App Settings Page

-
Go to Tools>FatMachines>FMSDK>Settings and click on Fill the settings button to open the Admob Settings Panel.

-
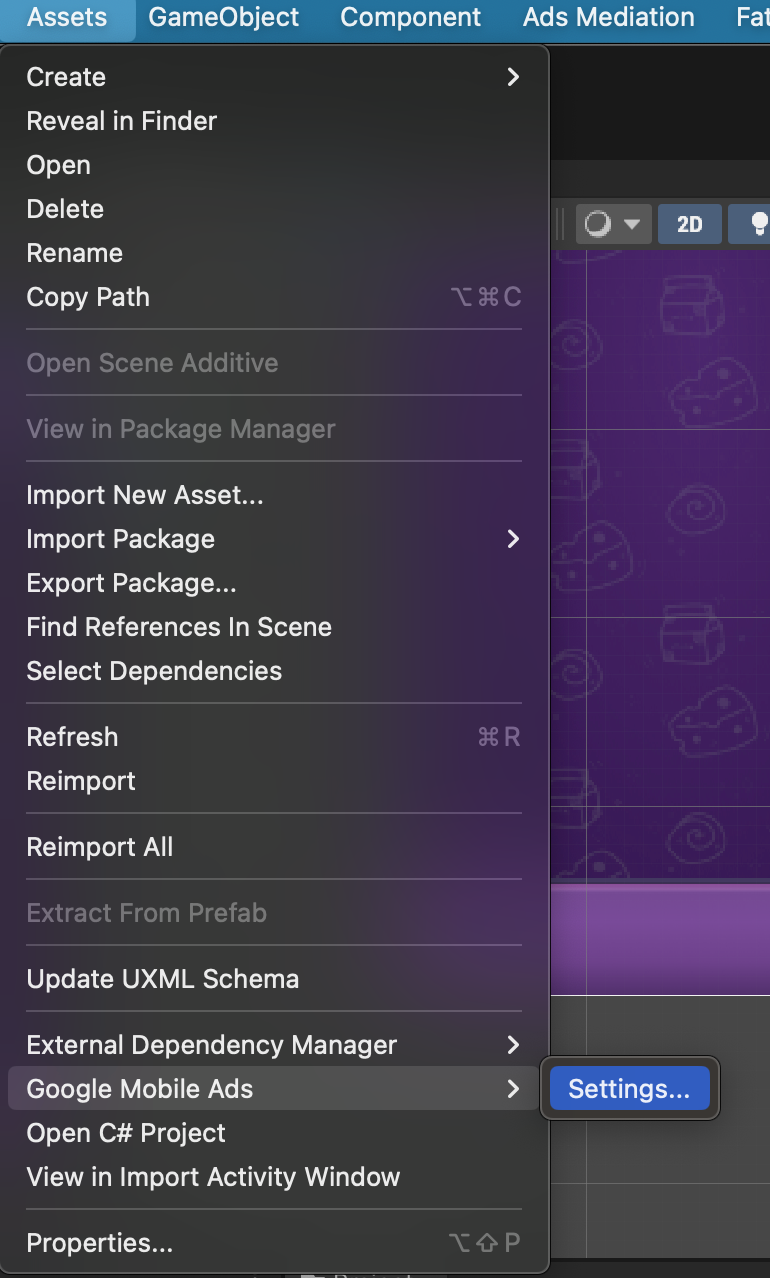
Or Directly Go to Assets>Google Mobile Ads>Settings and open the Admob Settings Panel
-
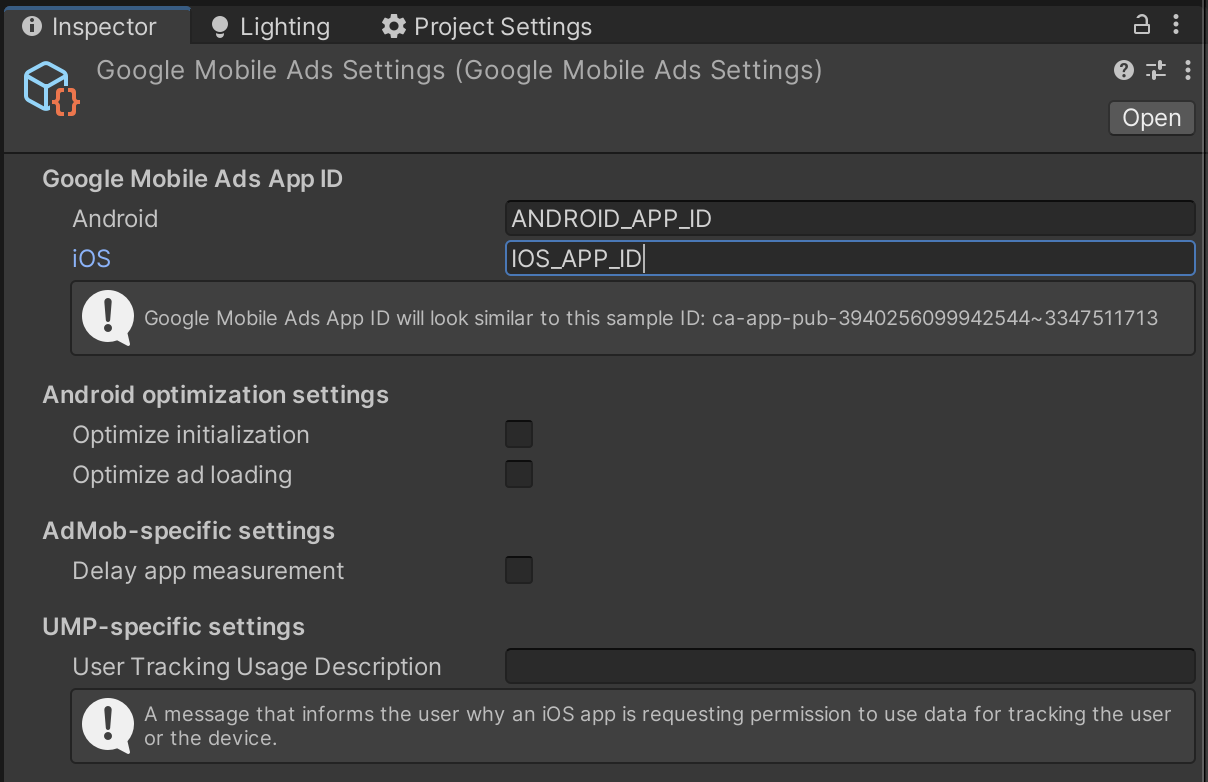
Fill the Admob data in the inspector
-
You need to create Rewarded Ad, Interstitial Ad, Banner Ad and App open Ad unit ids and put these into remote config.
To do that go to Ad Units in Admob Dashboard and click on Add ad unit.

-
Create the ad units which are required in the game. Currently supported ad types in the SDK are Banner, Interstitial, Rewarded and App Open

-
Now go to your Unity Project and go to Tools>FatMachines>FMSDK>Remote Defaults

-
Fill your newly created ad unit ids into the defaults
Use pre defined keys admob_banner_ad_id for Banner Ad Unit Id.
admob_interstitial_ad_id for Interstitial Ad Unit Id
admob_rv_ad_id for Rewarded Ad Unit Id
admob_app_open_id for App Open Ad Unit Id

-
Let's fill these values in Firebase Remote Config as well
By doing this, you'll be able to change these ad units without any update in future.

-
Admob setup is ready to be used now.
Applovin
First of all, Downloads Applovin SDK from Applovin Official website or download the tested version 6.4.2 from here
-
Import the package in Unity
-
After importing the package, Resolve Play Services Libraries for Android or Cocoapods for iOS
Go to Assets>External Dependency Manager>Android Resolver>Force Resolve for Android

Or Go to Assets>External Dependency Manager>iOS Resolver>Install Cocoapods for iOS

-
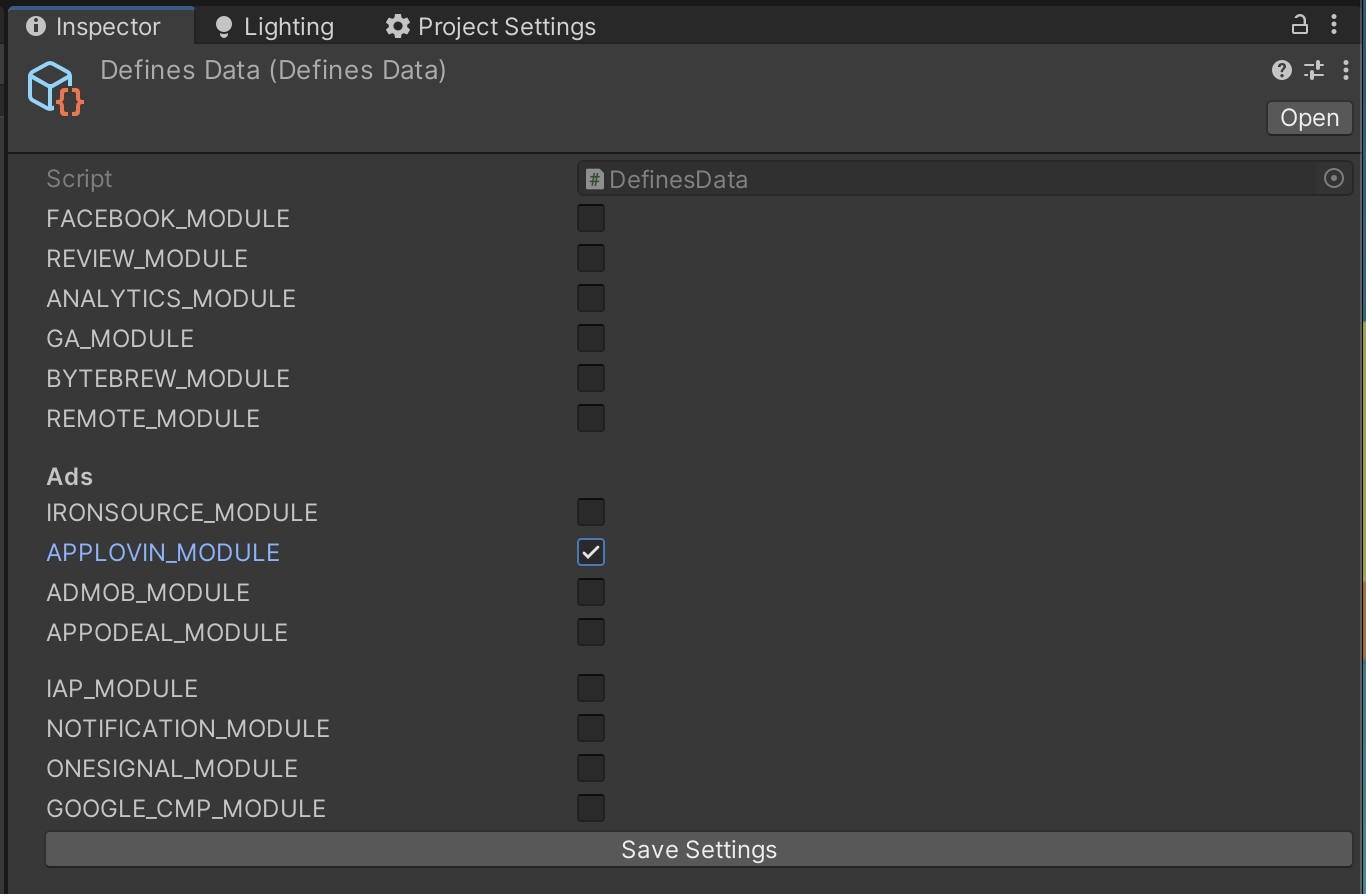
Now, enable APPLOVIN_MODULE in Defines Settings and click on Save Settings
-
Sign up on Applovin dashboard and get your SDK Key from there..
-
Go to Applovin Dashboard and create a new Ad Unit Id

Create Ad Unit id for every Ad type you want to use in the game.
-
By going into SDK networks section, you can setup your mediation with other ad networks.
You can get repeat this process to get App Id for both the platforms.
-
If you are using Admob in your mediation, you'll require Admob App Id as well. Let's create one here
Go to Admob Dashboard
Click on Apps>Add App

-
Fill in the required information

-
Once you create your Admob App, you can find the App Id from App Settings Page

-
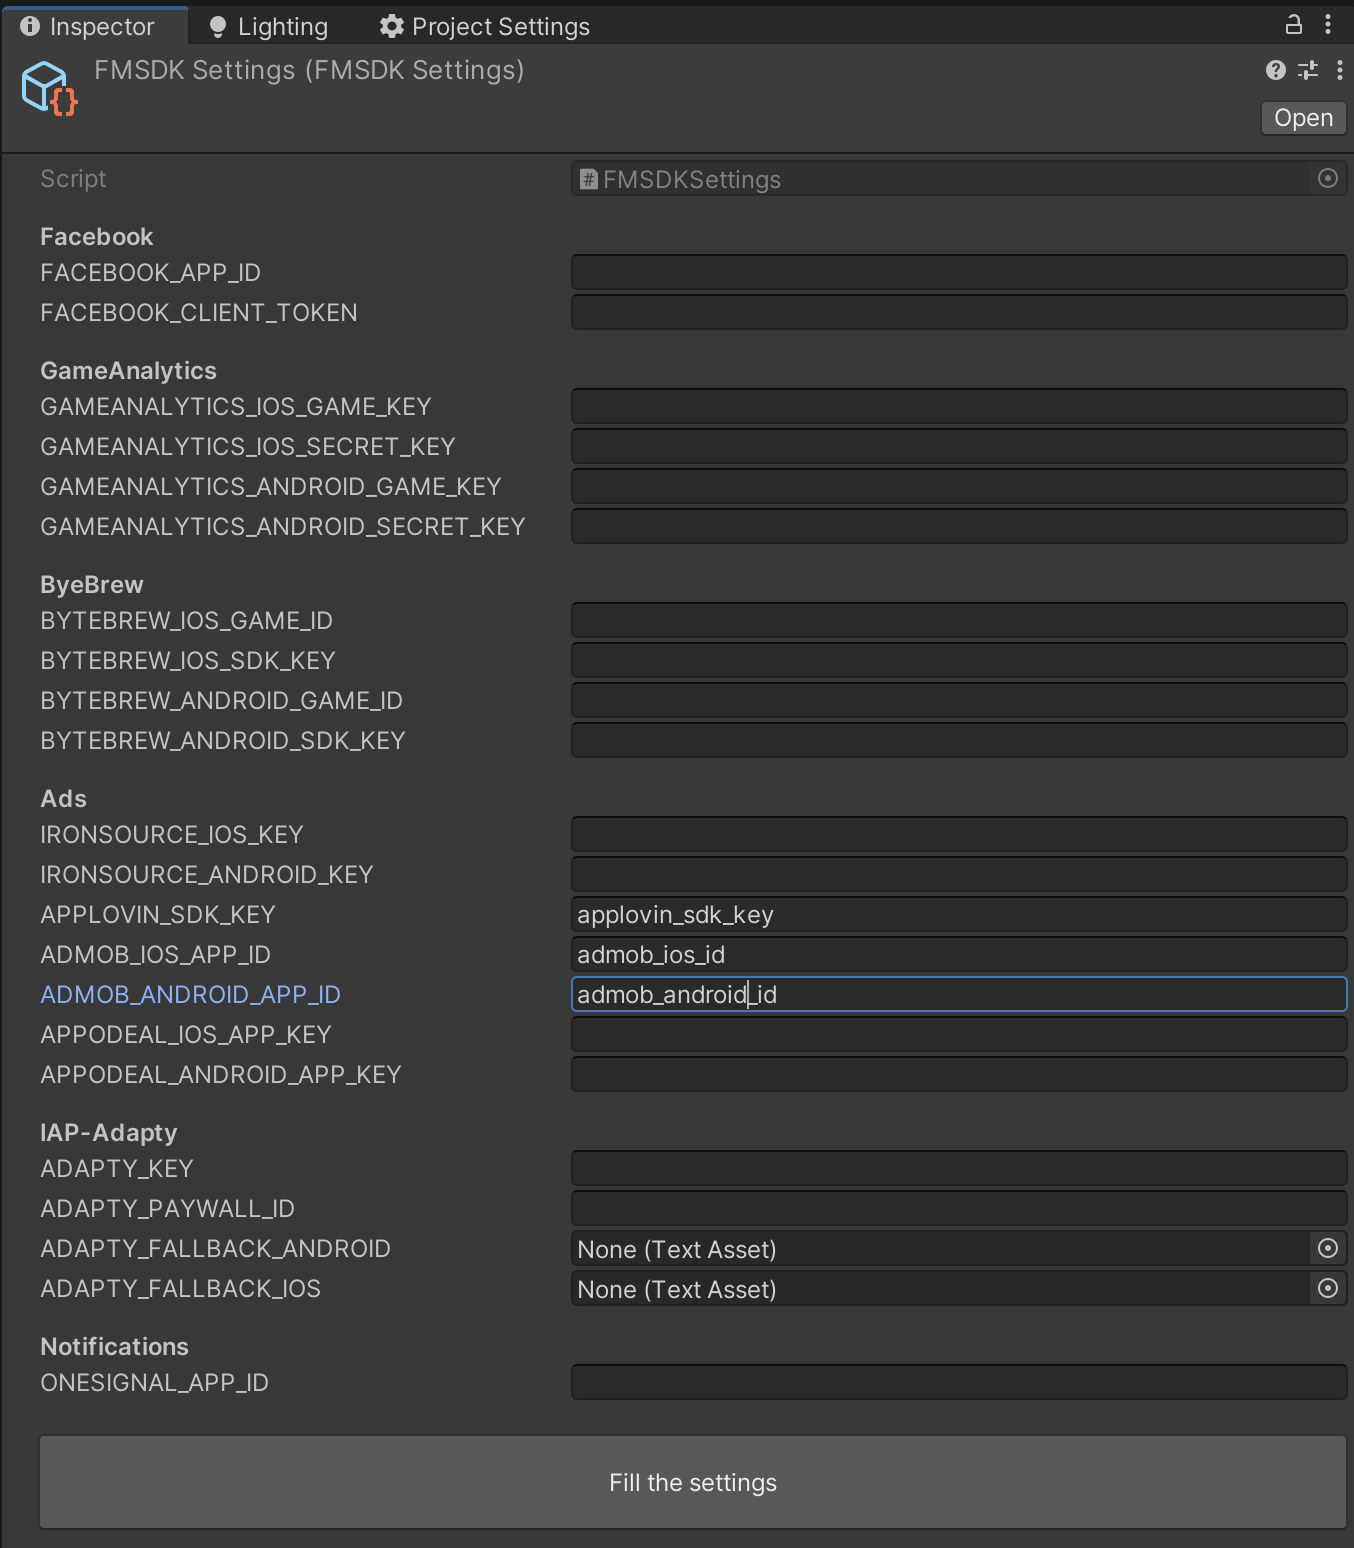
Go to Tools>FatMachines>FMSDK>Settings to fill the Ironsource Settings.

-
Fill the Applovin Settings in the inspector window and click on Fill the Settings button
Don't forget to enable APPLOVIN_MODULE in Defines Settings before this step.
-
Now go to your Unity Project and go to Tools>FatMachines>FMSDK>Remote Defaults

-
Fill your newly created ad unit ids into the defaults
Use pre defined keys applovin_banner_ad_id for Banner Ad Unit Id.
applovin_int_ad_id for Interstitial Ad Unit Id
applovin_rv_ad_id for Rewarded Ad Unit Id
applovin_appopen_ad_id for App Open Ad Unit Id

-
Let's fill these values in Firebase Remote Config as well
By doing this, you'll be able to change these ad units without any update in future.

-
Applovin setup is ready to be used now.
Appodeal
First of all, Downloads Admob SDK from Google's Official website or download the tested version 8.5.2 from here
-
Import the package in Unity
-
After importing the package, Resolve Play Services Libraries for Android or Cocoapods for iOS
Go to Assets>External Dependency Manager>Android Resolver>Force Resolve for Android

Or Go to Assets>External Dependency Manager>iOS Resolver>Install Cocoapods for iOS

-
Now, enable ADMOB_MODULE in Defines Settings and click on Save Settings

-
You need to get the iOS and Android app ids from the admob dashboard. Let's create one here
Go to Admob Dashboard
Click on Apps>Add App

-
Fill in the required information

-
Once you create your Admob App, you can find the App Id from App Settings Page

-
Go to Tools>FatMachines>FMSDK>Settings and click on Fill the settings button to open the Admob Settings Panel.

-
Or Directly Go to Assets>Google Mobile Ads>Settings and open the Admob Settings Panel

-
Fill the Admob data in the inspector

-
You need to create Rewarded Ad, Interstitial Ad, Banner Ad and App open Ad unit ids and put these into remote config.
To do that go to Ad Units in Admob Dashboard and click on Add ad unit.

-
Create the ad units which are required in the game. Currently supported ad types in the SDK are Banner, Interstitial, Rewarded and App Open

-
Now go to your Unity Project and go to Tools>FatMachines>FMSDK>Remote Defaults

-
Fill your newly created ad unit ids into the defaults
Use pre defined keys admob_banner_ad_id for Banner Ad Unit Id.
admob_interstitial_ad_id for Interstitial Ad Unit Id
admob_rv_ad_id for Rewarded Ad Unit Id
admob_app_open_id for App Open Ad Unit Id

-
Let's fill these values in Firebase Remote Config as well
By doing this, you'll be able to change these ad units without any update in future.

-
Admob setup is ready to be used now.
IAP Module - Using Adapty
Adapty will help you make In App Purchases, Subscription and their management and validation. There is an Adapty dashboard where you can track your revenue as well.
-
First of all, download the Adapty SDK. You can download it from the official website or download the tested version 3.4.0 from here
-
After importing the package, Resolve Play Services Libraries for Android or Cocoapods for iOS
Go to Assets>External Dependency Manager>Android Resolver>Force Resolve for Android

Or Go to Assets>External Dependency Manager>iOS Resolver>Install Cocoapods for iOS

-
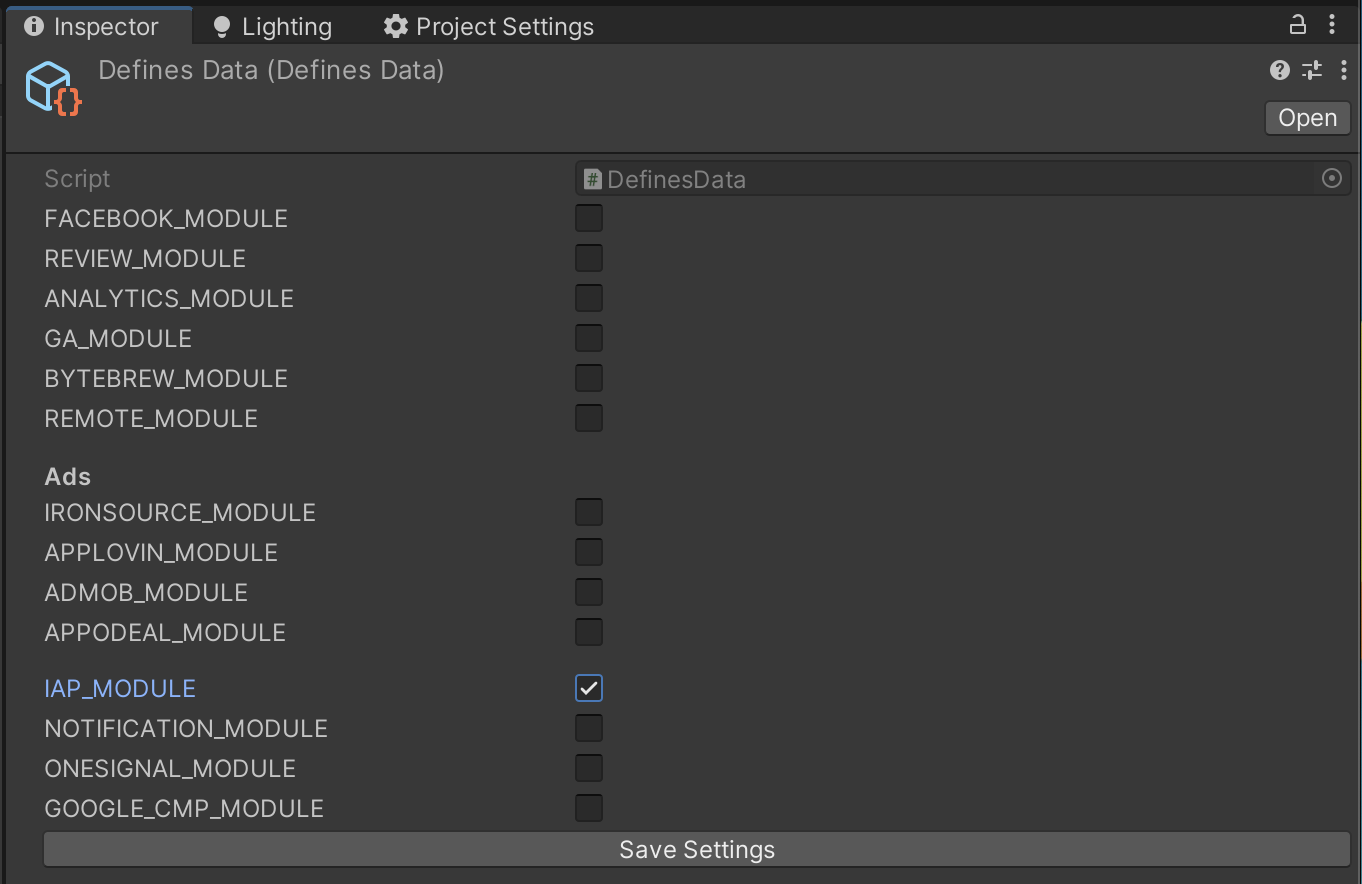
Enable IAP_MODULE in defines settings and click on Save Settings
-
Now, let's get the Adapty Keys and Fallback files from the dashboard
Go to Adapty Dashboard and create a new App.

-
Go to App Settings of newly created App and In the General section scroll to bottom.
Copy Public SDK key

-
Start filling the adapty keys in unity settings.
Go to Tools>FatMachines>FMSDK>Settings

-
Fill copied Public SDK Key into ADAPTY_KEY section

-
Now, let's work to get ADAPTY_PAYWALL_ID and fallback files.
In the Adapty Dashboard, go to Paywalls & Products section.
Create Access Levels which ever will be used in your game.

-
Now, go to Products tab and start adding the product you'll be using in your game IAP
If it's a one time purchase, Select Lifetime in the Period section. Or you can enter the period of your subscription.
Enter the details for both of your platforms

-
You'll have a products list and you'll be able to download the fallback files from here.
But let's wait and create a Paywall for these products first

-
Go to Paywalls tab and create a paywall containing all the created products in it.

-
Now, go to Placements section from the left panel and Create a new placement
Add recently created Paywall in the Placements and give a placement id

-
Copy this newly created placement id and paste it into the unity settings

-
Now, in the Adapty Dashboard, go to Paywalls & Products section and click on Products tab.
Click on Fallbacks and download fallback files for both the platforms into your unity project

-
Now go to the settings in Unity and place these fallback text files into their corresponding slots.
Click on Fill the Settings button. This is mandatory as it's gonna create new plist file for iOS and fill the AndroidManifest with the Adapty Key.

Functions in the IAP Module
-
Making a purchase for IAP or Subscription
The BuyProduct function will automatically record your IAP revenue in Firebase, GameAnalytics, ByteBrew and Facebook analytics
FM.IAPManager.BuyProduct("remove_ads", (_success, _err) => { if (_success) { Debug.Log("Remove Ads in the game"); } else { Debug.Log("Error: " + _err); } }); -
Get Product Price
string price = FM.IAPManager.GetProductPrice("remove_ads"); -
Restore Purchases
FM.IAPManager.RestorePurchases(new string[] { "remove_ads", "premium" }, (_activeAccessLevel, _purchasedProductIds, _err) => {
    if (_activeAccessLevel.Contains("remove_ads") && _purchasedProductIds.Contains("remove_ads")) {
        Debug.Log("Restore Remove Ads");
    }
    if (_activeAccessLevel.Contains("premium") && _purchasedProductIds.Contains("weekly_sub")) {
        Debug.Log("Restore Weekly Subscription");
    }
});
First argument will be the array of string which contains the access levels you want to restore. In the example, we are fetching remove_ads and premium access levels. It'll fetch all the purchased products under these two access levels
Second argument will be the callback which contains a list of Active Access Levels, Purchased Product Ids List and error if it occurred while restoring purchase
-
Get Profile
FM.IAPManager.GetProfile(new string[] { "remove_ads", "premium" }, (_activeAccessLevel, _purchasedProductIds, _err) => {
    if (_activeAccessLevel.Contains("remove_ads") && _purchasedProductIds.Contains("remove_ads")) {
        Debug.Log("Remove Ads Active");
    }else{
        Debug.Log("Remove Ads Disabled");
    }
    if (_activeAccessLevel.Contains("premium") && _purchasedProductIds.Contains("weekly_sub")) {
        Debug.Log("Weekly Subscription Active");
    }else{
        Debug.Log("Weekly Subscription Ended");
    }
});
When the game starts and you want to check if user still has access to the purchased product or not. Or the subscription is still active. You can use the GetProfile function
-
Fetch Subscription Duration
string subDuration = FM.IAPManager.GetSubDuration("weekly_sub");
Notifications Module
Local scheduling functions and Remote Notification management are in their respective sections.
These are the common settings to be used in the game.
Notification Permissions are automatically managed but you can still ask for permission using:
FM.NotificationsManager.RequestPermission(_result => {
if(_result){
    Debug.Log("Notification Permission Acceped");
}else{
    Debug.Log("Notification Permission Rejected");
}
});
To check if you already have the permission, use:
bool permission = FM.NotificationsManager.Permission;Add callback for permission:
FM.NotificationsManager.AddOnPermission(_result => {
    if(_result){
        Debug.Log("Notification Permission Acceped");
    }else{
        Debug.Log("Notification Permission Rejected");
    }
});
Local Notifications
-
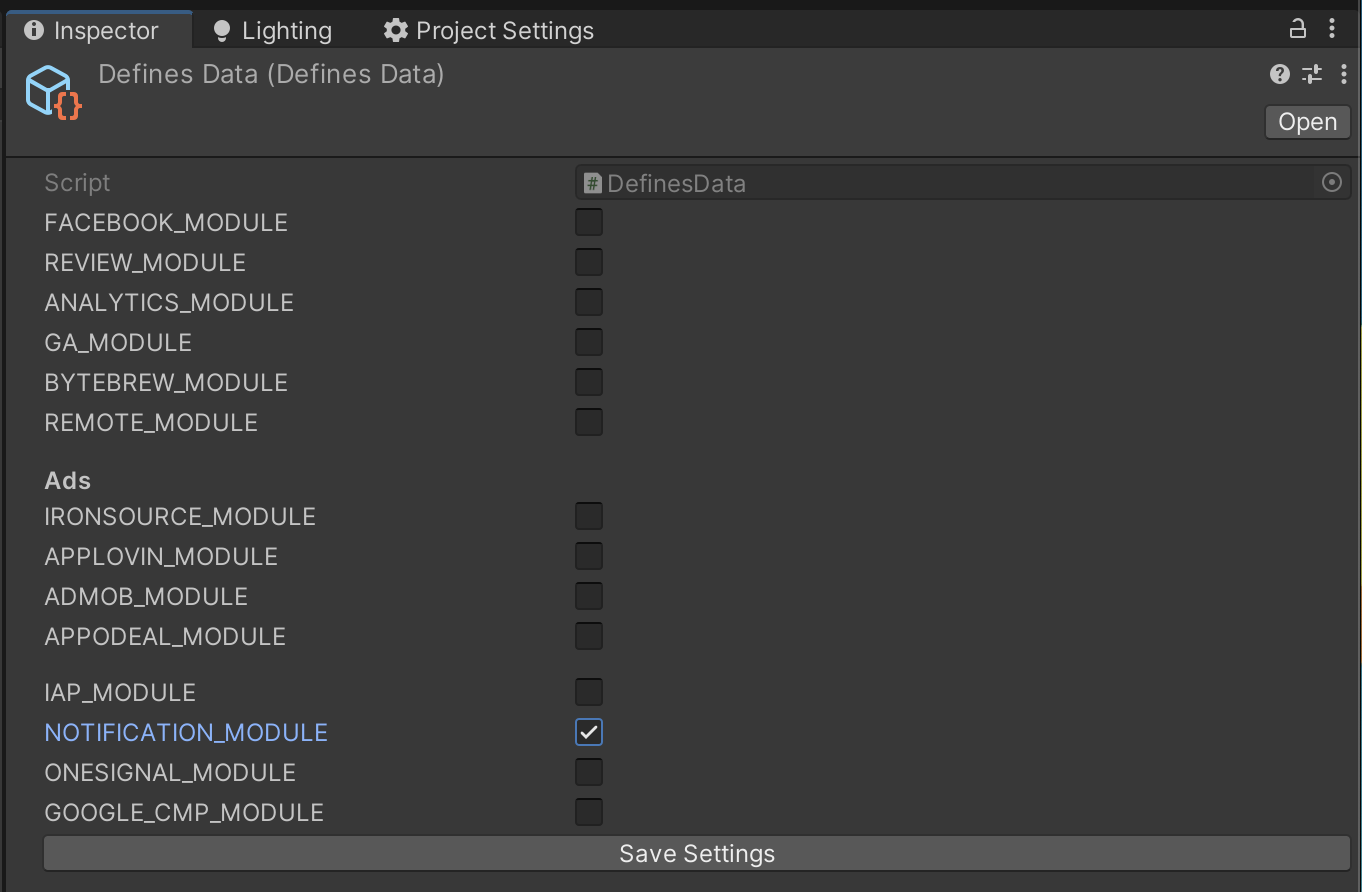
Go to Tools>FatMachines>FMSDK>Defines Settings and enable NOTIFICATION_MODULE and click on Save Settings
-
Go to Tools>FatMachines>FMSDK>Notification Settings

-
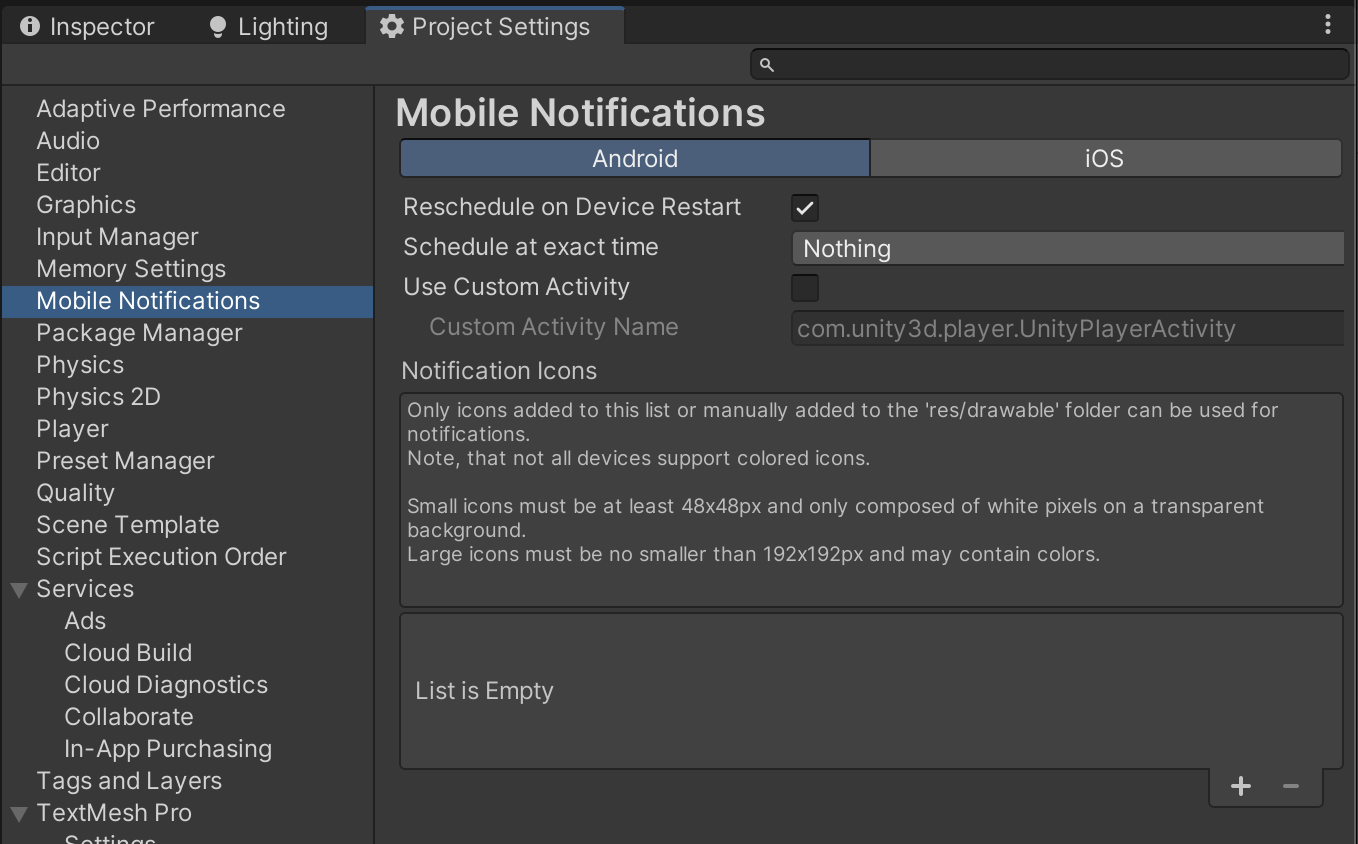
In the Android Section, Click on Reschedule on Device Restart if you want to
reschedule these notification after device restart
-
Keep Schedule at exact time Nothing.
-
And don't check Use Custom Activity.
-
You can use custom notification icons in android
-
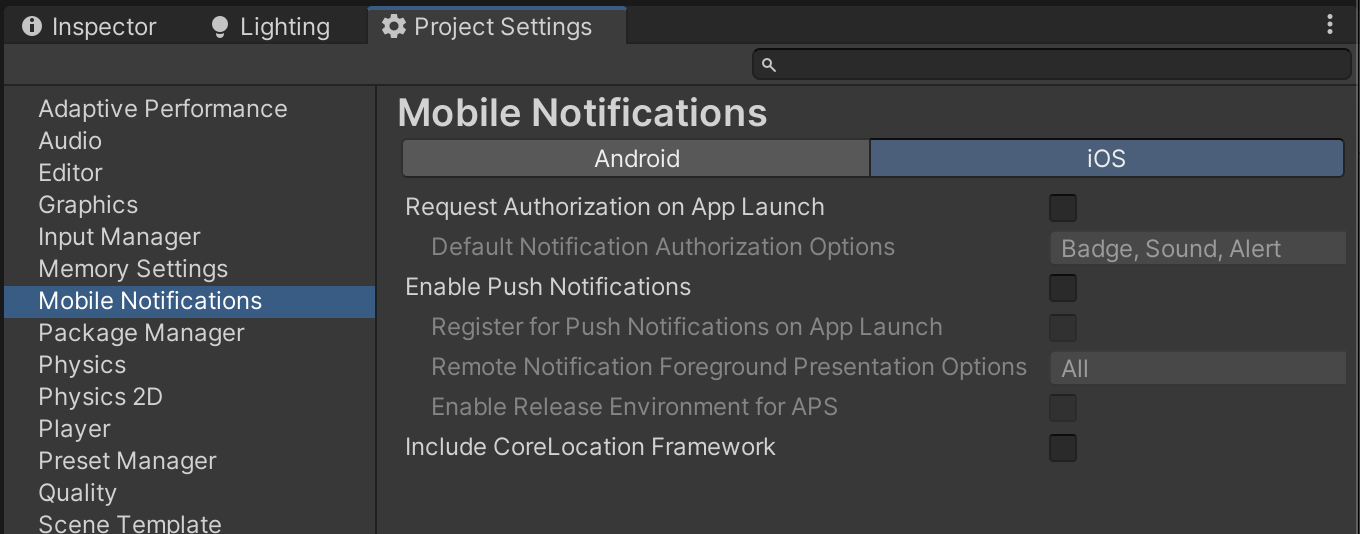
In iOS section, uncheck all the options. we'll be handling all of these via script
-
-
To schedule a local notification, use
You can put the icon name of the icon which you've added in the Android Settings
System.DateTime deliveryTime = System.DateTime.Now.ToLocalTime(); deliveryTime = deliveryTime.AddDays(1); NotificationsManager.Local.ScheduleNotification(title: "Notification Title", body: "Body", deliveryTime: deliveryTime, bigPictureUrl: "https://images.pexels.com/photos/1037992/pexels-photo-1037992.jpeg?auto=compress&cs=tinysrgb&w=600", OnComplete: _id => { Debug.Log("Notification Id: " + _id); }); -
Arguments in the ScheduleNotification() function
Argument Type Description title String Title of the notification body String Body of the notification deliveryTime System.DateTime Delivery Time smallIcon String Small Icon to show in the notification bar. (Put the icon in the settings and add the identifier here.)

largeIcon String Large Icon to show in the notification. (Put the icon in the settings and add the identifier here.) 
bigPicture String Image name added in StreamingAssets Folder (example: notif_banner.png) bigPictureUrl String Image url (example: https://images.pexels.com/photos/1037992/pexels-photo-1037992.jpeg?auto=compress&cs=tinysrgb&w=600)
If both arguments (bigPicture and bigPictureUrl) are given in the function, bigPictureUrl will be shown everytime.
But if there is any error while fetching the bigPictureUrl image, bigPicture image will be shown.OnComplete System.Action Get callback after scheduling notification and get scheduled notification id in the callback -
To cancel a scheduled local notification, use
FM.NotificationsManager.Local.CancelNotification(notifId: 1); -
To cancel all scheduled local notification, use
FM.NotificationsManager.Local.CancelAllNotifications(); -
To get the list of all scheduled notifications, use
List<PendingNotification> notifications = FM.NotificationsManager.Local.PendingNotifications(); -
You can get the callback if the notification has been delivered or expired. But this will only work if the game is in foreground.
FM.NotificationsManager.Local.AddOnNotificationDelivered(_notification => {
});
FM.NotificationsManager.Local.AddOnNotificationExpired(_notification => { });FM.NotificationsManager.Local.RemoveOnNotificationDelivered(_notification => { });FM.NotificationsManager.Local.RemoveOnNotificationExpired(_notification => { });
OneSignal
Onesignal will help you with remote notifications using OneSignal's server.
-
First of all, download the OneSignal SDK. You can download it from the official website or download version 5.0.2 to make it work with Unity 2021
-
After importing the package, Resolve Play Services Libraries for Android or Cocoapods for iOS
Go to Assets>External Dependency Manager>Android Resolver>Force Resolve for Android

Or Go to Assets>External Dependency Manager>iOS Resolver>Install Cocoapods for iOS

-
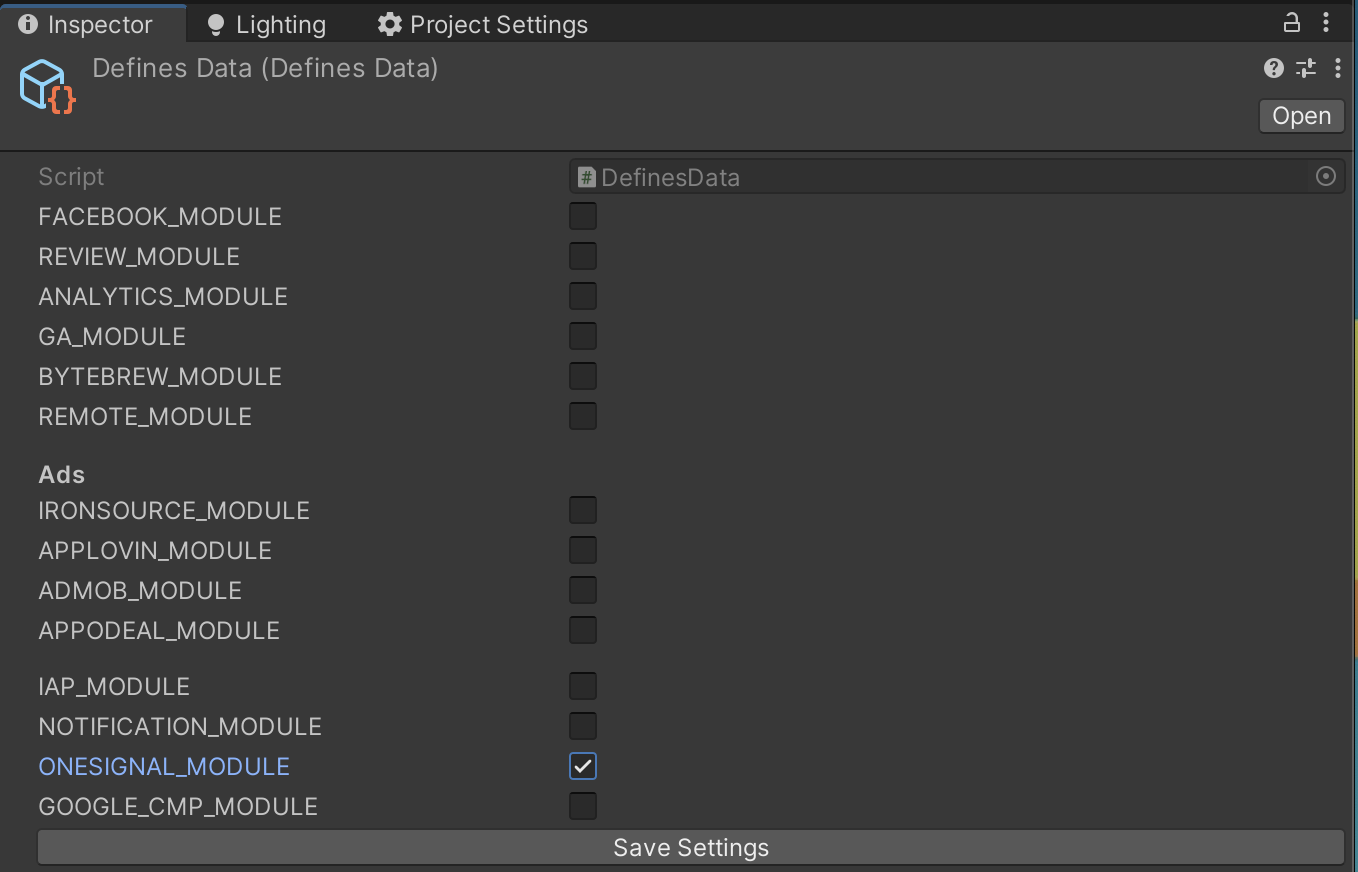
Enable ONESIGNAL_MODULE in defines settings and click on Save Settings
-
Go to Onesignal Dashboard and create a new App.

-
Follow the steps for both the platforms and configure accordignly.
Now, if you go to Settings>Keys & IDs, you can fing the OneSignal App ID on the page. Copy the app id

-
Fill your OneSignal App Id in the slot and click on Fill the Settings
Don't forget to enable ONESIGNAL_MODULE in Defines Settings before this step

Google CMP Module
It is used to show Google's default GDPR popup as it is now mandatory to serve ads.
-
Download the Google Mobile Ads SDK. You can download it from the official website or download the tested version 8.5.2 from here
If you are using Admob and have already downloaded the SDK, no need to download it again
If you are using Ironsource you have to download this SDK along with ironsource
-
After importing the package, Resolve Play Services Libraries for Android or Cocoapods for iOS
Go to Assets>External Dependency Manager>Android Resolver>Force Resolve for Android

Or Go to Assets>External Dependency Manager>iOS Resolver>Install Cocoapods for iOS

-
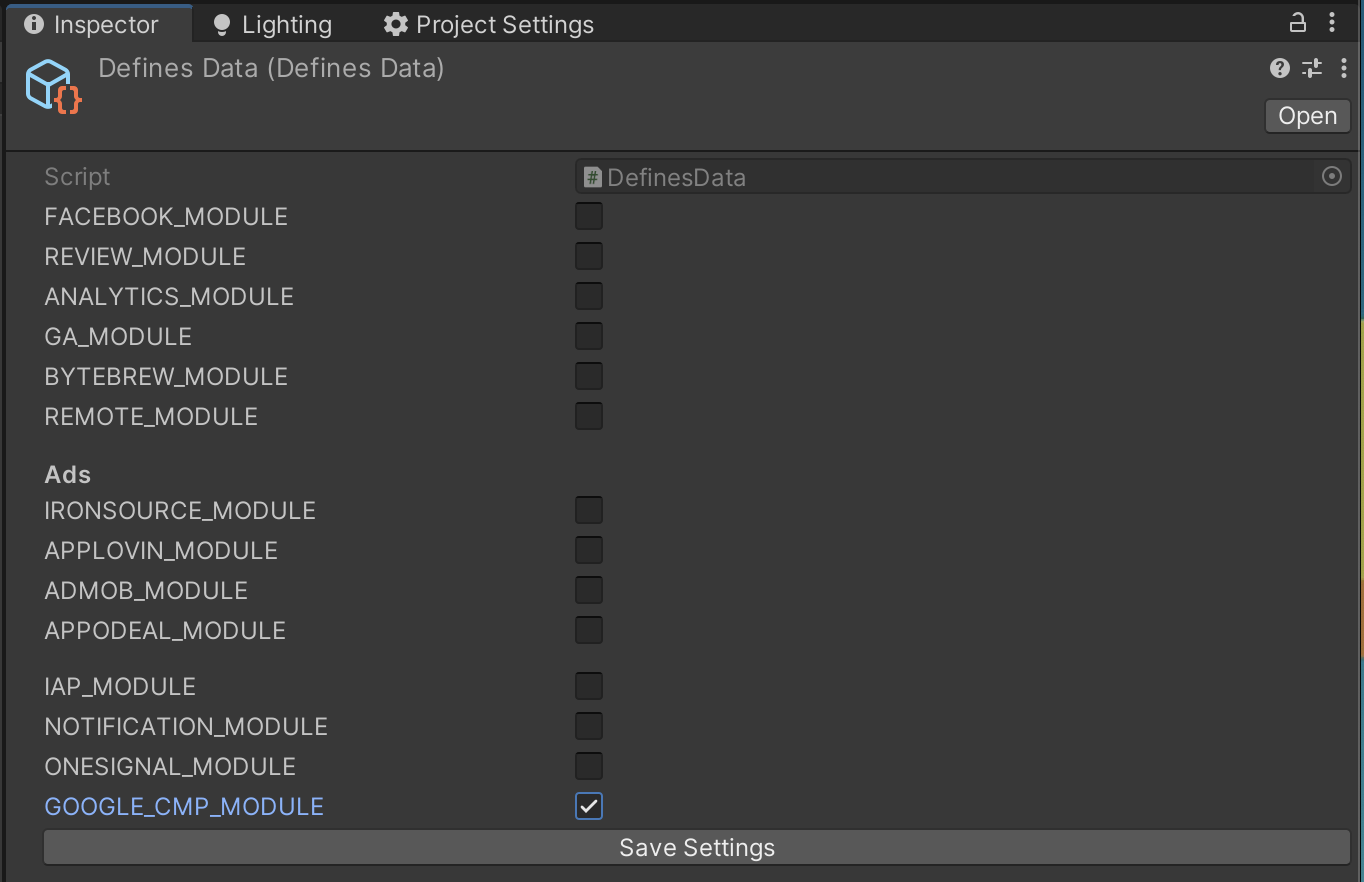
Enable GOOGLE_CMP_MODULE in defines settings and click on Save Settings
-
Now, the REMOTE_MODULE is enabled, we can control it via remote settings.
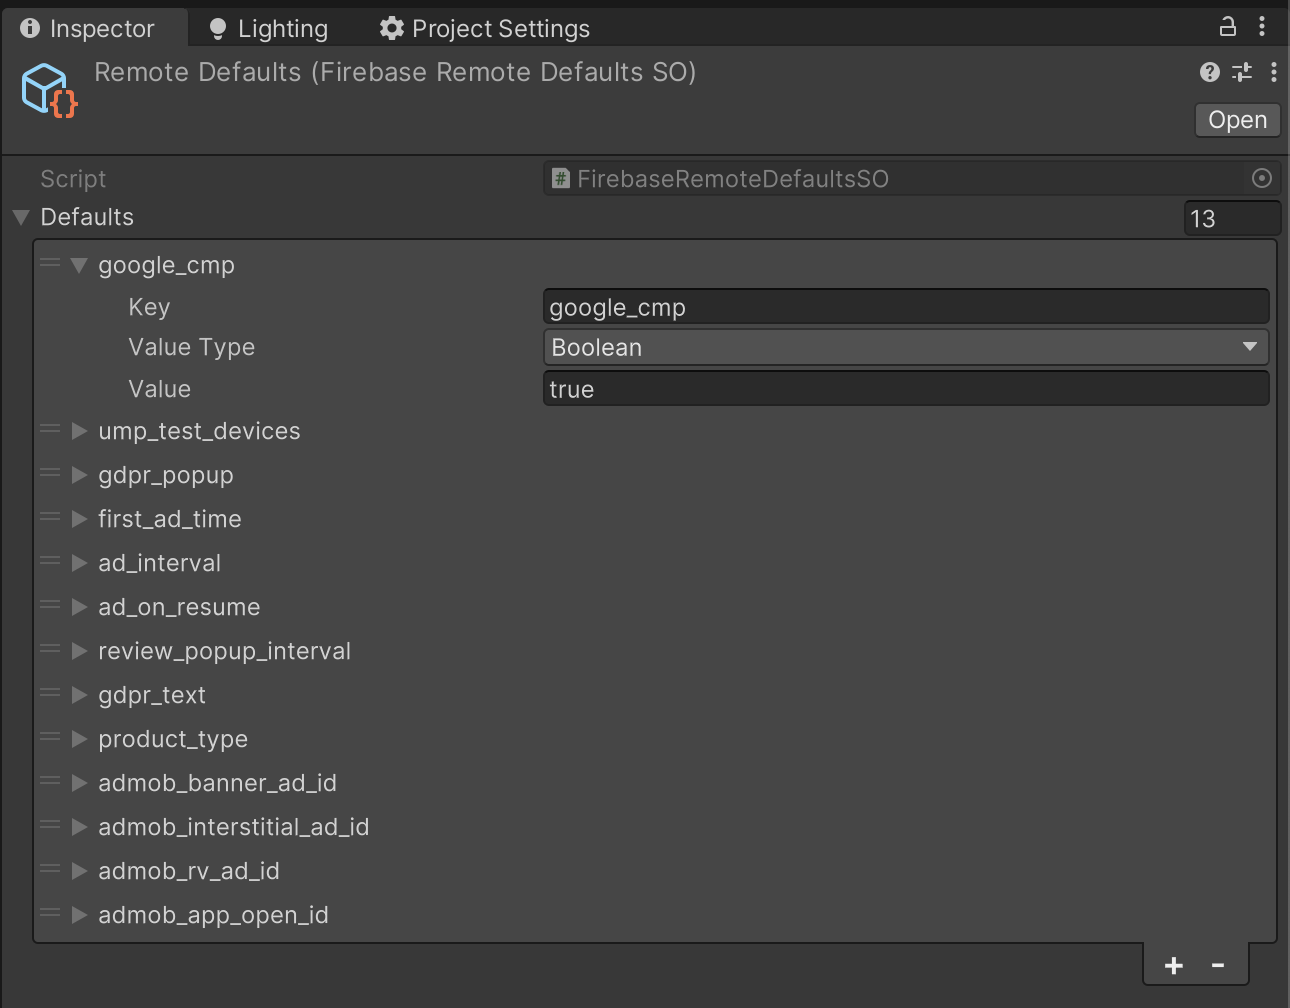
Go to Tools>FatMachines>FMSDK>Remote Defaults

-
You'll find google_cmp parameter in the settings and if not, you can create a new one.
Make type to boolean and fill true in the value
-
Go to Firebase Remote Config Dashboard and fill google_cmp value to true
Now, we'll be able to control it via remote config.

-
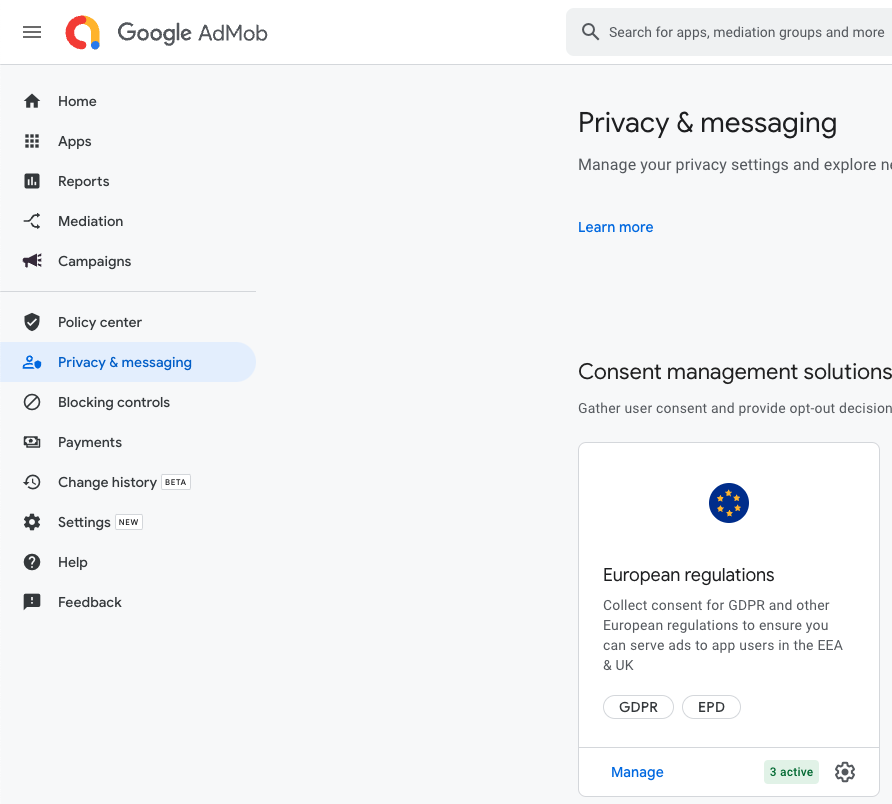
You need to create a CMP form in your admob dashboard as well.
Go to Admob Dashboard and go to Privacy & messaging
-
In European regulations card click on Create/Manage and create a new GDPR message
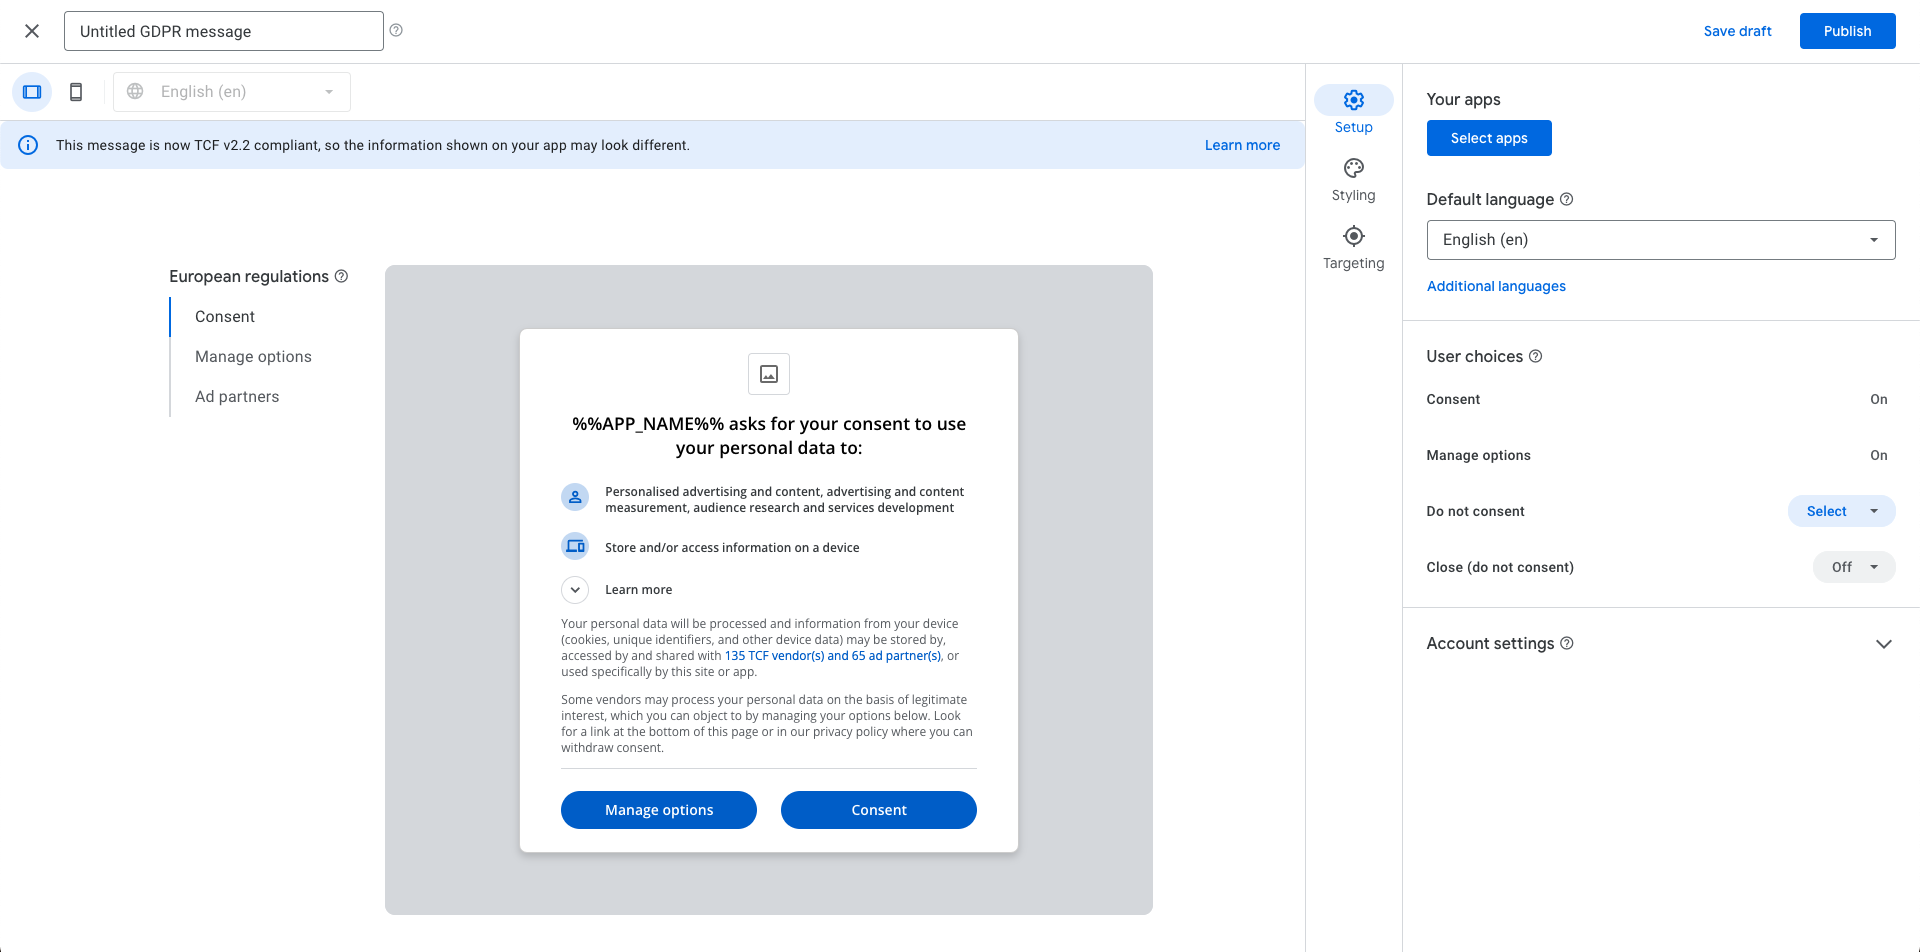
-
In the FMSDK prefab GameObject, we've already enabled Auto GDPR, which will show this popup when the game starts for the first time

-
You can call this popup manually by using:
//Don't use this code if Auto GDPR is checked if (FM.Remote.IsFetched) { GDPRManager.ShowPopup(_consentDone => { }); } else { FM.Remote.AddOnDataFetch(() => { GDPRManager.ShowPopup(_consentDone => { }); }); } -
You can add a callback to listen to the response.
GDPRManager.AddOnConsent(_consentGiven => { }); -
You'll be able to see the popup only in GDPR countries. If you want to see it on your device, add your device's test id.
To do that, go to Tools>FatMachines>FMSDK>Remote Defaults

-
Add a new parameter called "ump_test_devices" and keep the type string.

-
Put this parameter in Firebase Remote Config as well if you are using remote config.
-
To find your test device id, you need to run the project with GooglemobileAds Package first.
After running you'll see something like this in logcat or iOS logs.
If you search for test of debug device, you'll be able to find your id.

IDFA
You need to show IDFA popup in iOS 14+ devices in order to track ads..
-
If Auto IDFA is enabled in the FMSDK prefab, you don't need to worry about anything.

If not, use the following code wherever you want
//Don't use this code if Auto IDFA is checked FM.IDFA.IDFA.RequestPopup(_idfaStatus => { }); -
IDFA tracking works with SKADNetworks. So, you need to edit a list of Ad Networks which you want to use. A lot of Ad Networks are already added in the package. But you can alter it by going into Assets>Resources>FMSDK>sdkadnetworks.txt.
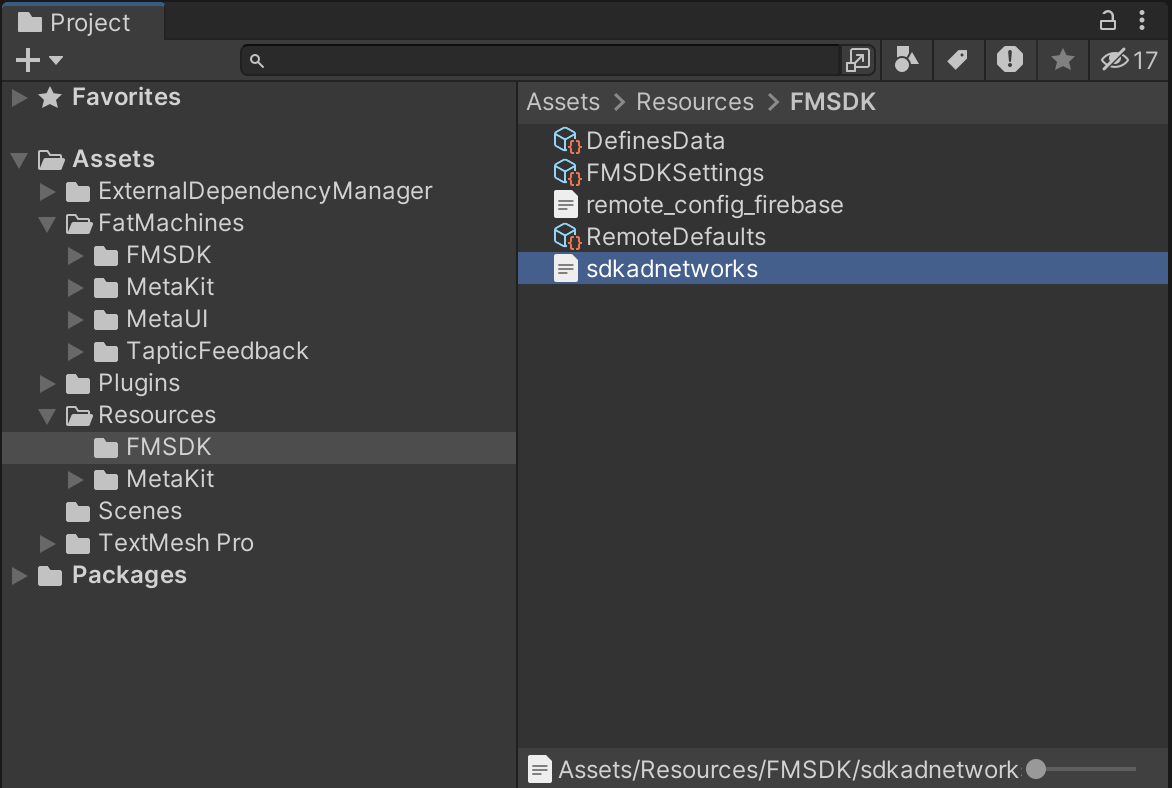
-
You can edit the description that is used in the popup and change the networks as you want
